Unbxd-Magento Set Up
General Settings
This section allows you to indicate the product types available in your catalog while excluding specific categories of products while synchronizing.
To upload product types:
On the Unbxd tab, click Catalog
In General Settings, within Available Product Types, select All Available Types to select all available product types within your catalog. Click the drop-down box to select from one of the product types.
Click Save Config
The Unbxd extension supports seven types of products:
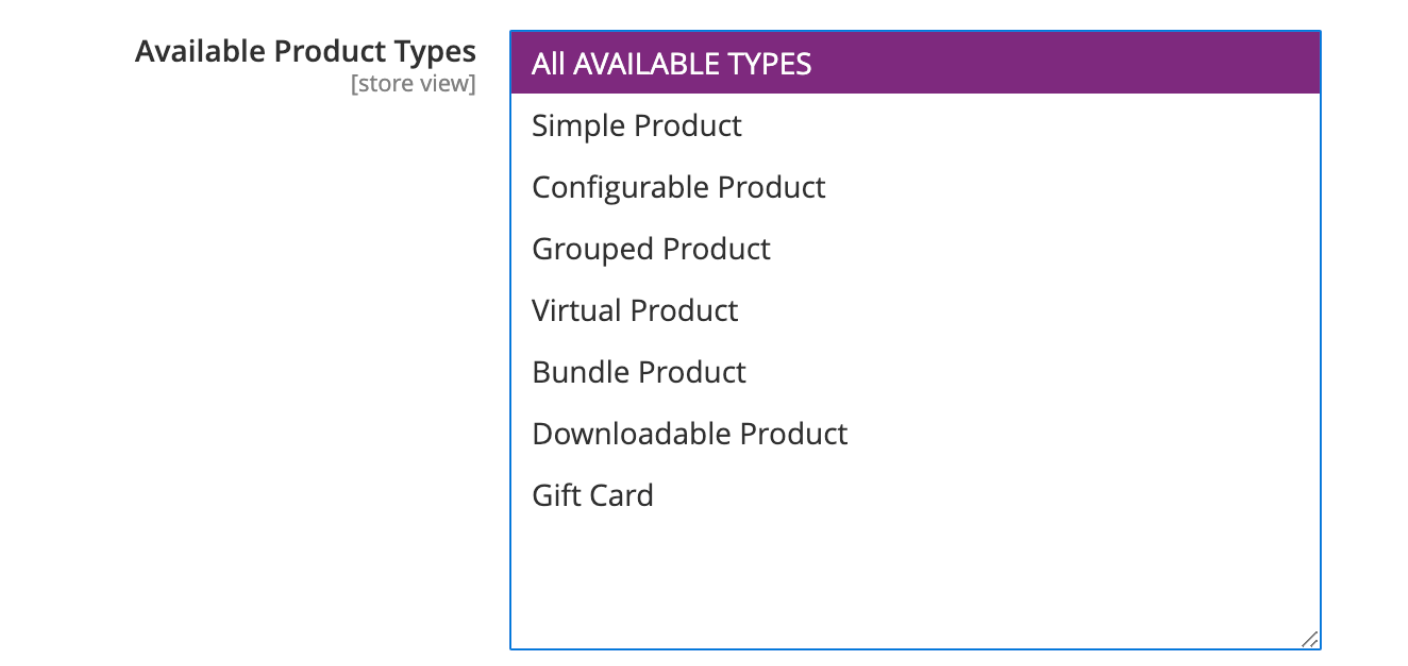
- Simple Product: A simple product is a physical item with a single SKU. When converted to the Unbxd format, a simple product is considered as a Normal Feed.
- Configurable Product: A configurable product is a parent product of multiple simple products. When converted to the Unbxd format, configurable products are considered as variants.
- Grouped Product: A grouped product presents multiple, standalone products as a group. You can offer variations of a single product, or group them for a promotion. The products can be purchased separately or as a group. Like configurable products, when converted to the Unbxd format, grouped products are considered as variants.
- Virtual Product: A Virtual Product or Digital Product can be used for intangible items such as a membership, service, warranty, or subscription. They can be sold individually or included in grouped or bundled products. They are the same as simple products but without the weight field.
- Bundle Product: Bundle product lets the shoppers choose from a variety of options to create their own customized version. The options are a bundle of simple products.
- Downloadable Product: A downloadable product can be anything that you can deliver as a file, such as an eBook, music, video, software application, or update. You can offer an album for sale and sell each song individually. You can also use a downloadable product to deliver an electronic version of your product catalog.
- Gift Card: The three types of gift cards are Virtual, Physical, and Combined. Gift cards can be set to Redeemable or Non-Redeemable. The lifetime of a gift card can be unlimited or set to a number of days. The value of a gift card can be set to a fixed amount or set to an open amount with a minimum and maximum value.
NoteIf your catalog has a mix of 'Simple products' and 'Configurable products' and you wish to send both Parent products and Variants to Unbxd, select both 'Simple Product' and 'Configurable Product' in the 'Available Products Types' dropdown
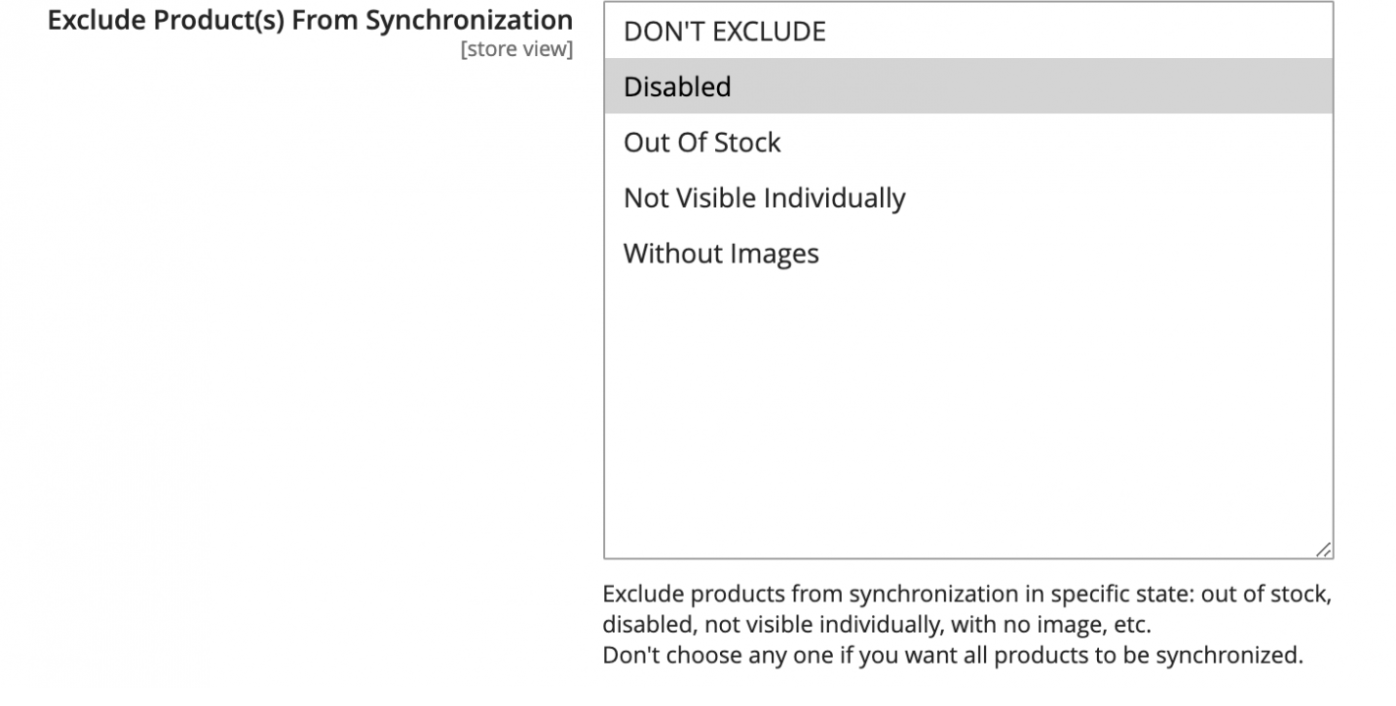
Our extension allows you to exclude four exclusive criteria of products:
- Disabled: Indicates products that have been disabled from being listed in the Product Listing Page
- Out Of Stock: Indicates products where the inventory count is 0
- Not Visible Individually: Indicates products that are available only as a bundle
- Without Images: Indicates products where there isn’t an available image
NOTESelect only one value
Maximum Number of Synchronization Attempts
The number of synchronization allowed in case of page load errors is specified in this bar. The value can vary between 1 to 5.

Category Configuration
Following are the configuration options available:
Use Category ID: Category ID will be sent to Unbxd
Retain Disabled Category: Yes | Retain Disabled Category in the category path
Fetch from Category Entity Tables: Fetch from Category Entity Tables, instead of using the index tables, (experimental for those customers where category index tables are not consistently updated.
Note: enabling this feature could result in longer processing time v/s category data accuracy fetched from eav (entity attribute value) tables.
Product Images Settings
This section walks you through the process of uploading images for your products in the catalog.
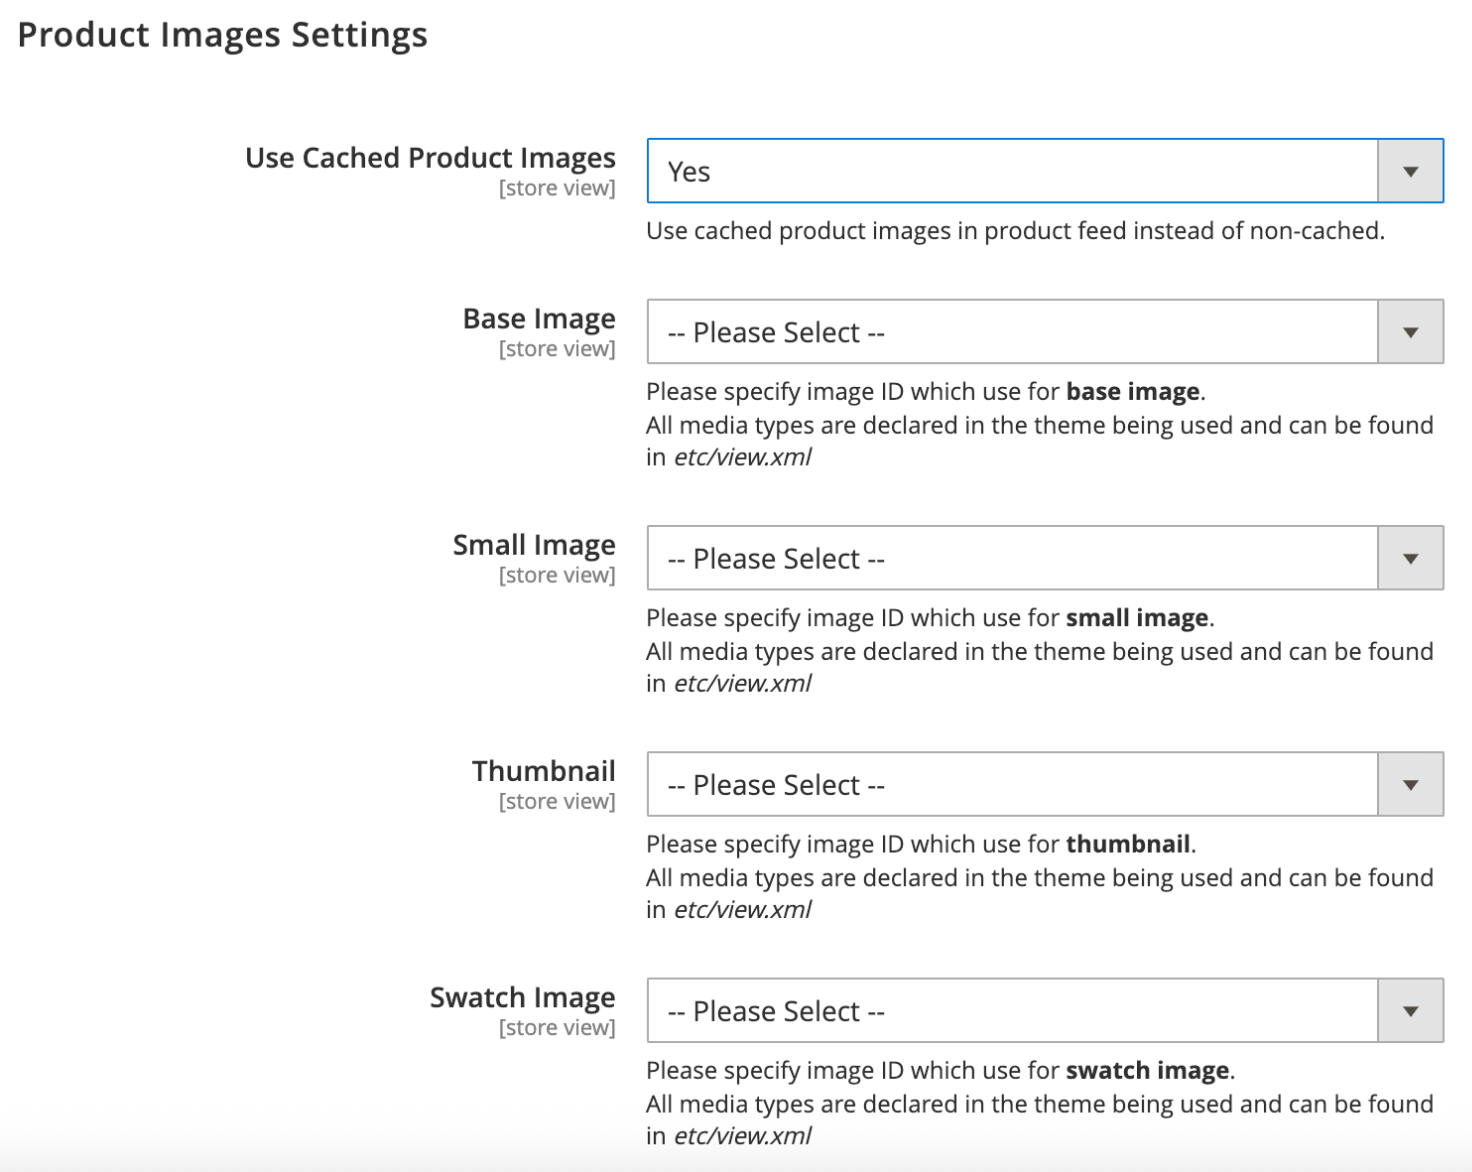
To enable Product Image Settings:
On the Unbxd tab, click Catalog.
Within Product Image Settings, select Yes for Enabling it. If you select No, you will have no product images to display.
Click Save Config.
You need to upload a base image after which all the relative images are automatically uploaded.
- Base Image: This is a high-resolution JPEG file of your product images.
- Small Image: This version of the image is used on pages with multiple products, such as homepage, category and search results layouts. It’s also used for small boxes on product pages, such as up-sells, and cross-sells. A normal size for this image is around 250 pixels high and 250 pixels wide.
- Thumbnail: This version of the image is often seen at the bottom of the product page. If you buy this product, you’ll also see this image in the shopping cart. These images can be around 100 pixels high and 100 pixels wide.
- Swatch Image: This version of the images is used in more advanced store setups. If your product is available in more colors or options (also called as variants), customers can click on the swatch images to see what each version looks like.
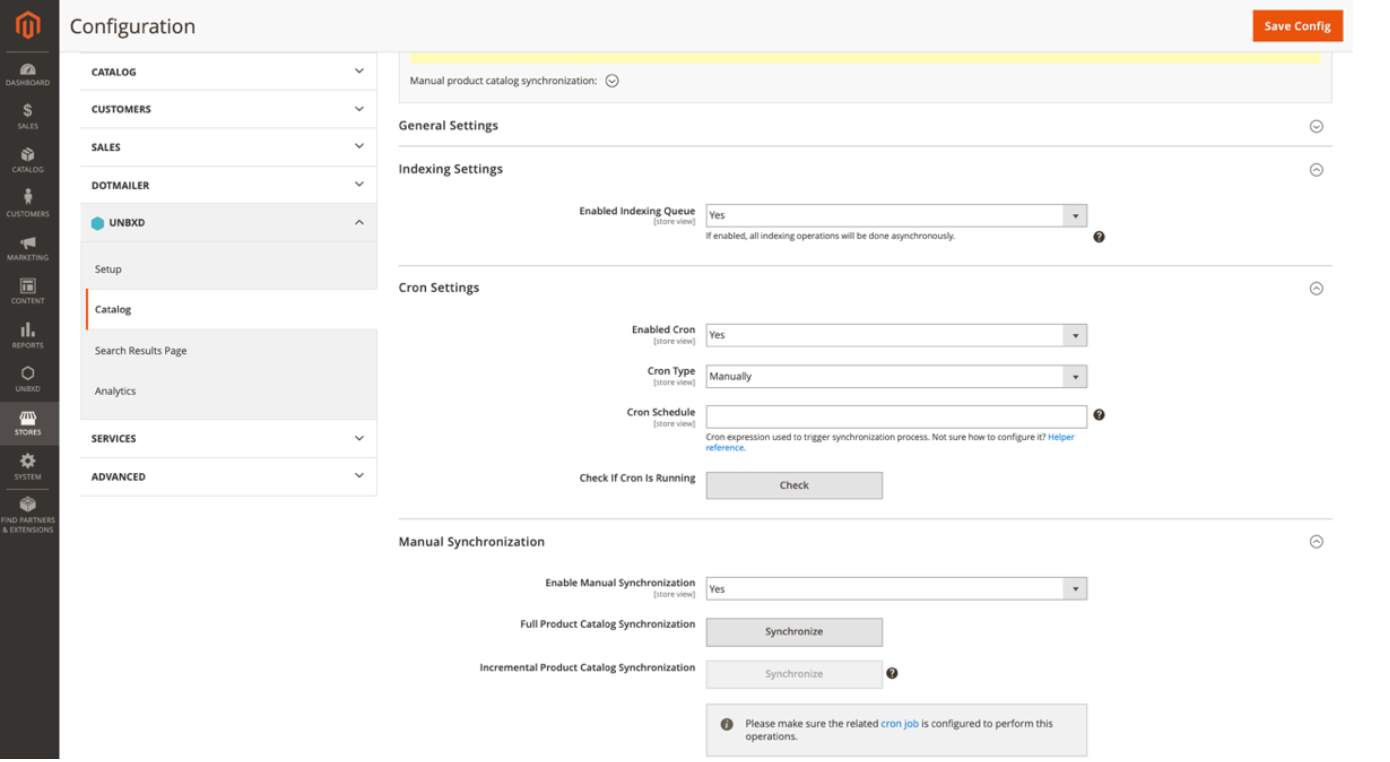
Indexing Settings
This section walks you through the process of configuration of the type of indexing operation.
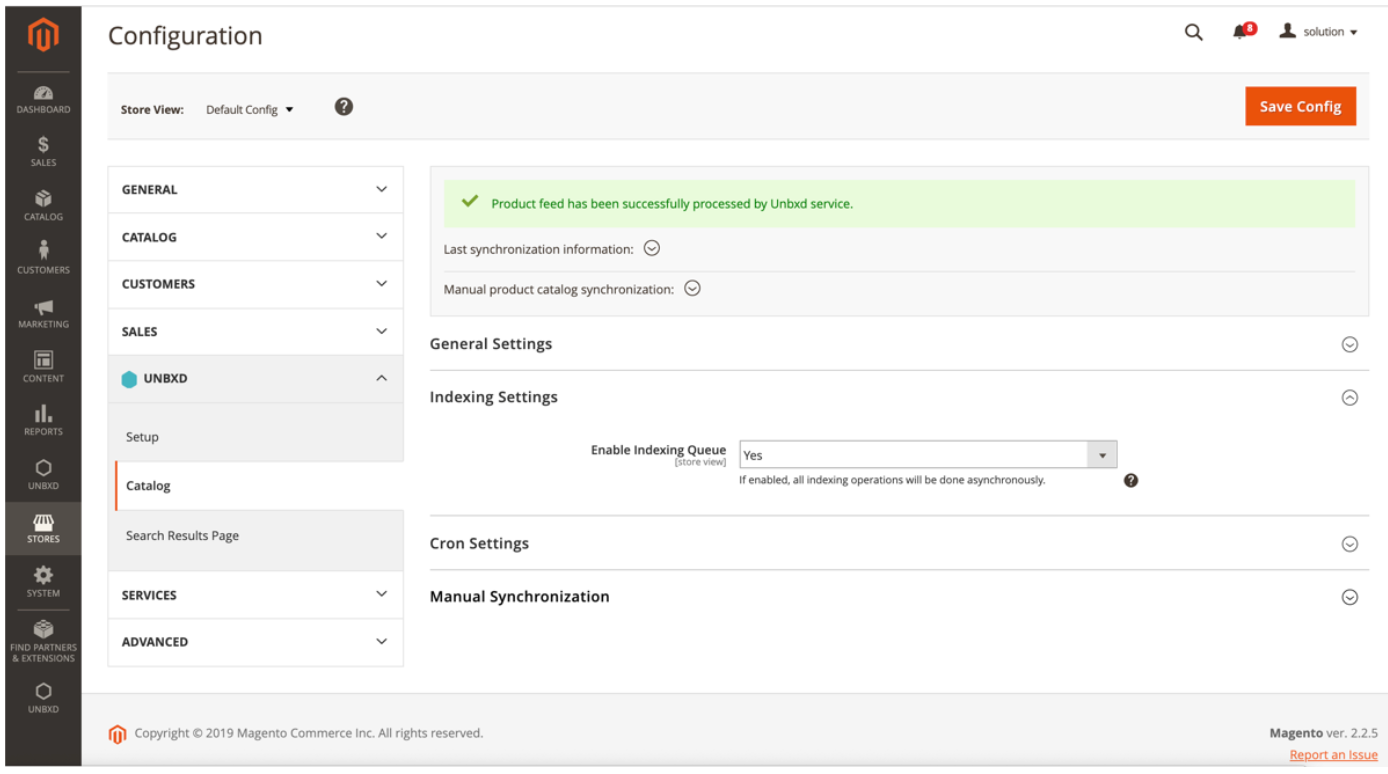
To enable indexing:
On the Unbxd tab, click Catalog
Within Indexing Settings, select Yes for Enable Indexing Queue. If you select No, your product catalog is not indexed automatically. Click Save Config
- If Enable Indexing Queue is set to ‘Yes’, then all indexing operations related to the products in the catalog will be added to the Indexing Queue and done asynchronously by a scheduled cron job.
- If Enable Indexing Queue is set to ‘No’, then all indexing operations related to the products in the catalog will be done immediately after the original product information is modified.
Indexing Optimization
By default full feed will be executed as a multi part upload with a batch size of up-to 10000 products per iteration. This enables us to limit the memory requirement under ( 0.75GB – 1.5 GB ) irrespective of the catalog size.
Reader Database support:
For customer who prefer to route the select queries to a dedicated reader database can leverage the following configuration.
NoteWe recommend you set Enable Indexing Queue to Yes when you are in Production Mode or if you have a product catalog that has more than 2 million products or is larger than 2GB.
Data Fields Mapping
Data Fields mapping provides the ability to manually map the Unbxd Fields to the defined product attribute.
Unbxd Field can have the values as Availability, Category Path Id, Image URL, Product URL, Title, or UniqueID which can be mapped to the product attribute specified in your catalog.
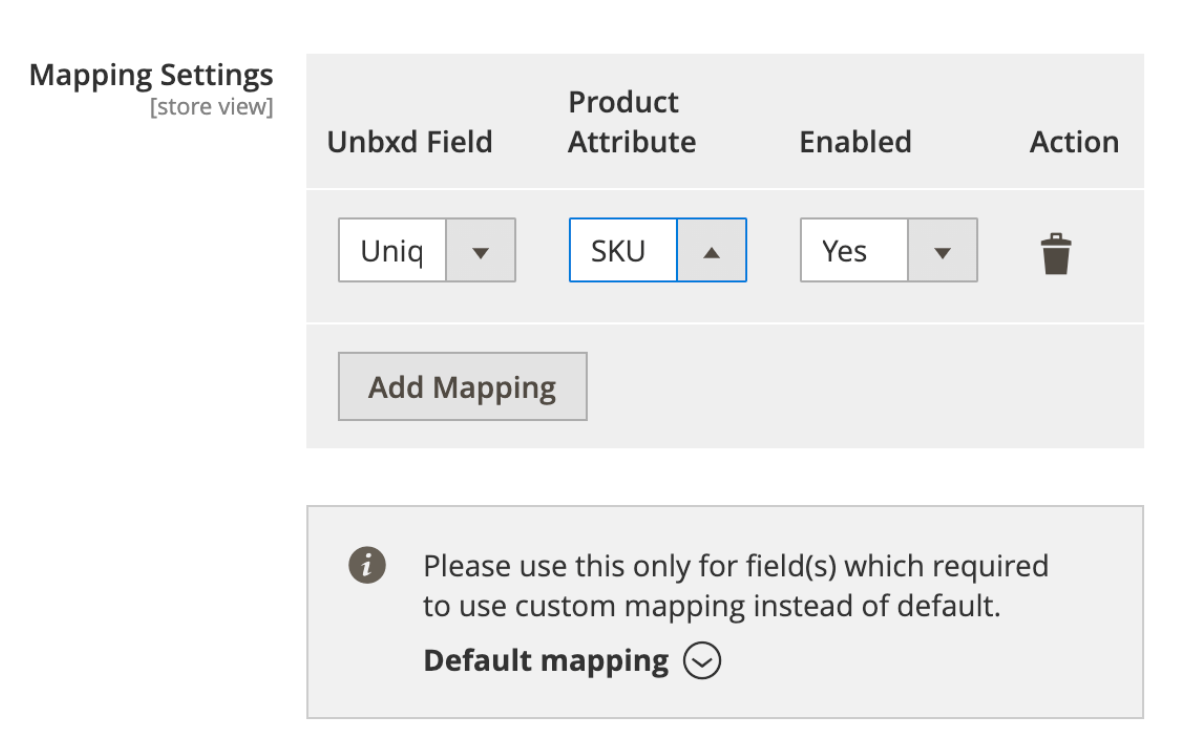
In the above illustration, we can see the Unbxd field ‘UniqueID’ is mapped to SKU to track the inventory status.
Catalog Sync
Before you sync your catalog, your Unbxd extension will upload your catalog as a JSON file and sync it to the Unbxd server in three ways:
- Automatic Synchronization
- Manual Synchronization
- Command Line Interface (CLI)
Automatic Synchronization
Our extension will send every update and deletion on products or categories to our servers to keep all data up-to-date by setting cron jobs.The indexers’ behavior can be changed to prevent these update calls, and only update the data through manual reindexing. For this to work, the cron type should be set to ‘Manually’.
- To schedule automated synchronization, On the Unbxd tab, click Catalog.
- To schedule automated indexing, within Cron Settings, select Yes for Enable Cron
- In Cron Type dropdown box, select the required type:
- Manually: When this is chosen, you can indicate the frequency of the cron job. When the Cron Type is set to Manually indicate the frequency of indexing within Cron Schedule.
- By Template: When this is chosen, you can indicate Start Time and the Frequency to ‘Daily’, ‘Weekly’, or ‘Monthly’.
- In the Cron Schedule text field, type in the required frequency. Click the icon for examples.
- To test the schedule, click the Check button for Check. If Cron Is Running. This lists the status and a log of the last 10 cron jobs.
- Click Save Config
You have successfully scheduled automated synchronization for your product catalog.
Manual Synchronization
You can also set to manually index your product catalog using manual synchronization options.
NOTEBefore you set up manual indexing, ensure the related cron job is configured.
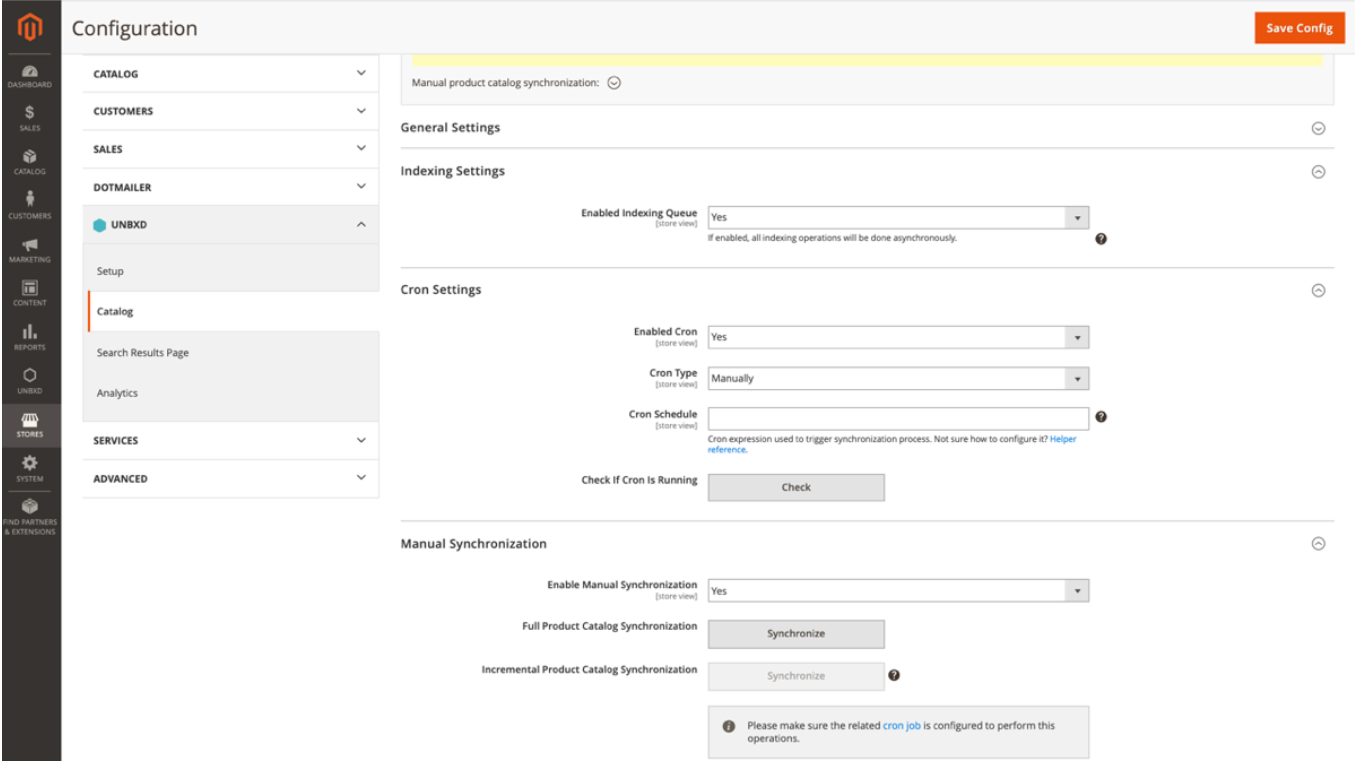
To set up manual synchronization:
On the Unbxd tab, click Catalog, In General Settings, within Indexing Settings, select Yes for Enable Indexing Queue.
- In Manual Synchronization, select Yes for Enable Manual Synchronization.
- To perform a full feed upload, click the Synchronize button for Full Product Catalog Synchronization. To perform a delta upload, click the Synchronize button for Incremental Product Catalog Synchronization. Click Save Config
- You have successfully set up Manual synchronization for your product catalog.
To check the status of the feed upload, click Unbxd > Feed View.
NoteTo avoid causing unnecessary resource delays and timeout errors, the synchronization operation will be added to the Indexing Queue even when Enable Indexing Queue is set to Number.
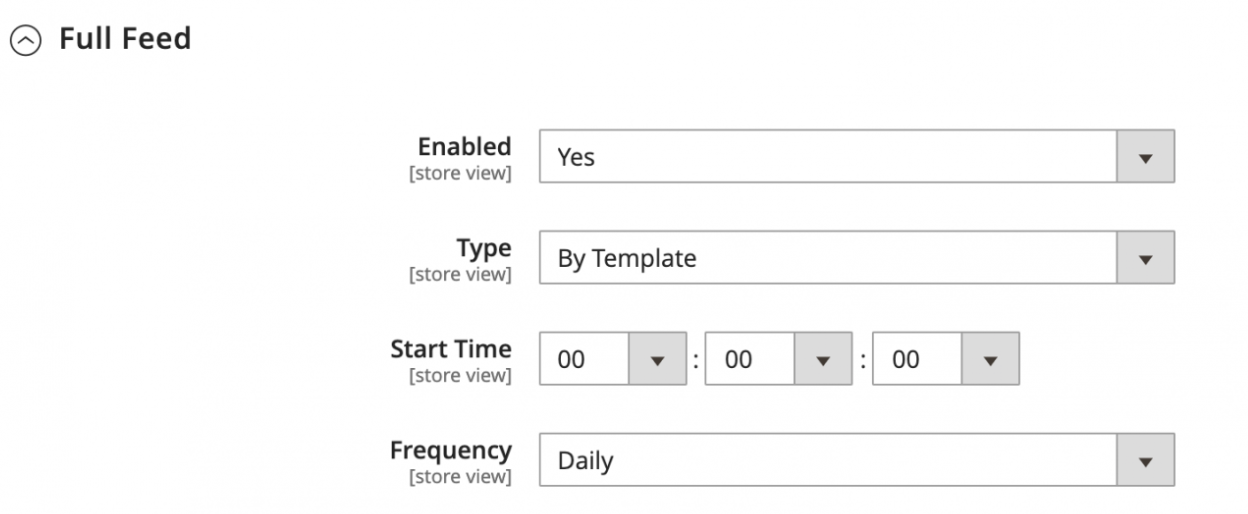
By navigating to Unbxd > Catalog > Cron Settings > Full Feed, you can automatically upload the full feed.
Command Line Interface
You can use the Command Line Interface to update your product catalog from within the Magento directory.
Add the –h key to see the features and configuration of each command. More about Magento CLI commands here.
- Full product Catalog Synchronization
This command allows you to perform a full product catalog synchronization. If the specific store ID is not specified, synchronization will occur for default store ID.
To schedule a full catalog synchronization, run:
php bin/magento unbxd:product-feed:full- Incremental Product Catalog Synchronization
This command allows you to perform an incremental product catalog synchronization. If the specific store ID is not specified, synchronization will occur for default store ID.
To schedule an incremental catalog synchronization, run:
php bin/magento unbxd:product-feed:incremental- CheckFeed Upload Size
This command allows you to check the total size of the feed being uploaded for a specific store. If the specific store ID is not specified – a default store ID will be used.
To check the file size of the feed, run:
php bin/magento unbxd:product-feed:upload-sizeProduct Feed Generation
Product Feed can be generated in different formats viz .csv, .txt, or XML file formats. You can include all the product type to generate feed: simple, bundle, downloadable, grouped, or configurable.
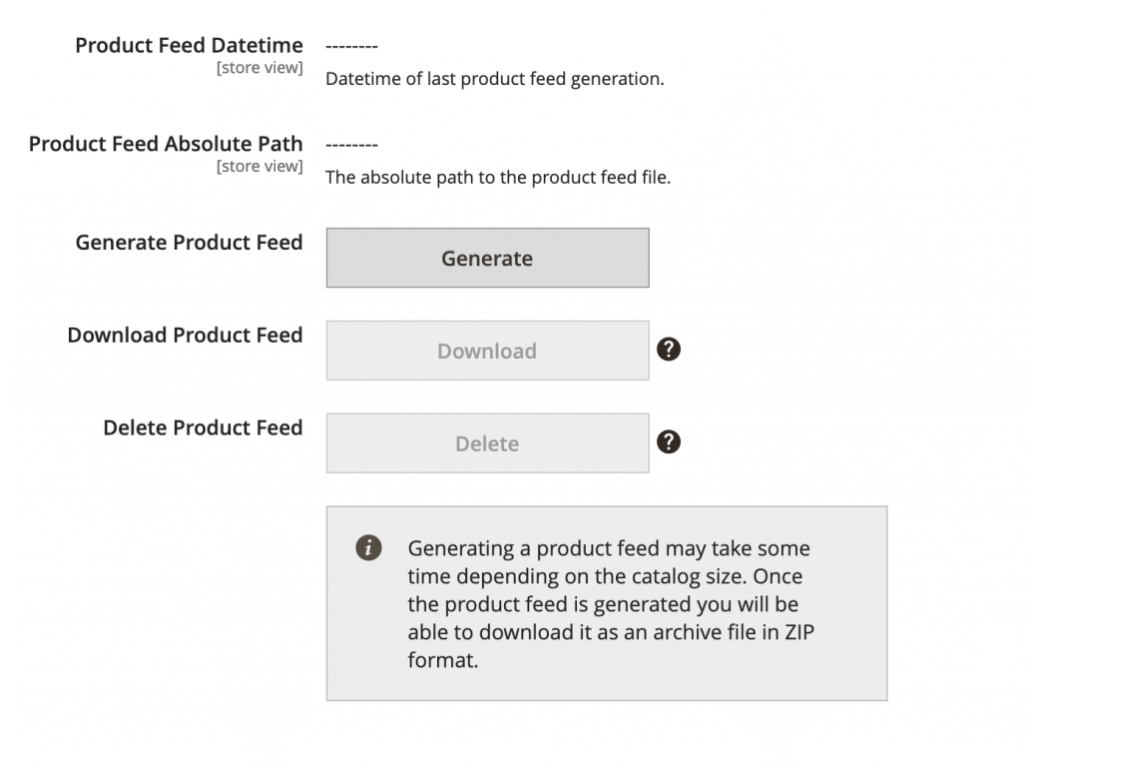
You can generate product feed, download it, or delete the existing one.
Optimize Product Data To Send To Unbxd
Depending on the line of business each of our customers has 100+ product specific information. By default the plugin will send all the product attributes configured in your system. Whereas Unbxd only needs product attributes which satisfies one or more of the following condition.
The attributes contain information which the customer will be searching on (name, description, brand, categories…)
The attributes are used to create facets on the website (brand, price, color, screenSize …)
The attributes are shown on the product tile in the search results page (ratings, delivery information, images , productUrl ….)
We recommend customers review the list of product attributes and enable it to be sent to Unbxd only ones that meet the criteria listed above.
To disable an attribute being sent in the product feed to Unbxd:
- Navigate to Stores > Attributes > Product
- Select the respective product attribute and navigate to storefront properties
- Update value for Include in Product Feed attribute to “No”
- Click on save attribute
Customize Product Feed to Send Additional Information
Unbxd Product Feed extension is designed to be extended based on customer specific requirements. Like, there will be instances where you would like to send additional product information which are not managed as product attributes in Magento (ex: vendor specific pricing and availability for a customer running marketplace website, where prices and availability is managed per vendor using some third party magento extension).
To append additional information per product:
- Create a php class which implements Unbxd\ProductFeed\Model\Indexer\Product\Full\DataSourceProviderInterface
- Implement the appendData functionfunction appendData($storeId, array $indexData)
- The second argument $indexData to the function is an associative array with key as product entityId and the value will an array of attributeName -> respective values.
- Iterate through the array and add custom product information as additional attributes on the product array.
Refer to an implementation sample used to compute reviewCount & finalRating for every product stored by Magento_Review extension.
<!--?php


namespace Unbxd\ProductRating\Model\Product\DataSourceProvider;


/**
* @author      Jag S <[email protected]>
*/


use Unbxd\ProductFeed\Model\Indexer\Product\Full\DataSourceProviderInterface;
use Unbxd\ProductFeed\Logger\LoggerInterface;
use Magento\Framework\DB\Adapter\AdapterInterface;
use Magento\Catalog\Api\ProductRepositoryInterface;
use Magento\Review\Model\RatingFactory;
use Unbxd\ProductFeed\Helper\Data as HelperData;
use Exception;


class ProductRatingDataProvider implements DataSourceProviderInterface
{
   /**
    * Related data source code
    */
   const DATA_SOURCE_CODE = 'rating_productfeed_extension';


   const REVIEW_COUNT = "reviewCount";


   const RATING_SUM = "ratingSum";


   const FINAL_RATING = "finalRating";


    /**
    * @var LoggerInterface
    */
   private $logger;


    /**
    * @var HelperData
    */
   private $helperData;


   protected $productRepository;


   /**
    *
    *
    * @var RatingFactory
    */
   protected $ratingFactory;


   /**
    * Constructor.
    */
   public function __construct(ProductRepositoryInterface $productRepository,LoggerInterface $logger, HelperData $helperData, RatingFactory $ratingFactory) {
       $this->productRepository = $productRepository;
       $this->logger = $logger->create("feed");
       $this->helperData = $helperData;
       $this->ratingFactory = $ratingFactory;


   }


   /**
    * {@inheritdoc}
    */
   public function getDataSourceCode()
   {
       return self::DATA_SOURCE_CODE;
   }


   /**
    * Add custom code here
    *
    * {@inheritdoc}
    */
   public function appendData($storeId, array $indexData)
   {
       /* product ID is the entity id in magento , add your custom logic for your custom attribute */
       foreach (array_keys($indexData) as $productId) {
           try {
               if ($productId != "fields"){
                   /**
                    * Replace the logic within this if condition to that of yours
                    */
                   $entitySummary = $this->ratingFactory->create()->getEntitySummary($productId);
                   if($entitySummary){
                       $data = $entitySummary->getData();
                       if($data && array_key_exists("count",$data)){
                           $reviewCount = $data["count"];
                           $indexData[$productId][self::REVIEW_COUNT] = $reviewCount;
                           $ratingSum = $data["sum"];
                           $indexData[$productId][self::RATING_SUM] = $ratingSum;
                           $ratingAvg = round($ratingSum/(20*$reviewCount));
                           $indexData[$productId][self::FINAL_RATING] = $ratingAvg;
                       }
                   }
               }
           } catch (\Exception $e) {
               $this->logger->error('Error Getting Entity Summary -'.$productId. $e->__toString());
           }
       }
       $this->addIndexedFields($indexData,self::REVIEW_COUNT);
       $this->addIndexedFields($indexData,self::RATING_SUM);
       $this->addIndexedFields($indexData,self::FINAL_RATING);


       /**
        * Replace the second argument with that of the attribute name which was included in line 75
        * addIndexedFields accepts a third optional argument which should one of the following values ('text','longText','decimal','number','link','date','bool','sku','path')
        * */
       return $indexData;
   }


   /**
    * @param $indexData
    * @return
    */
   private function addIndexedFields(array &$indexData,$attrName,$fieldType = "number")
   {
       $alreadyExistFields = array_key_exists('fields', $indexData) ? $indexData['fields'] : [];
       $indexData['fields'] = array_merge($alreadyExistFields, [$attrName => [
           'fieldName' => $attrName,
           'dataType' => $fieldType,
           'multiValued' => false, /*set it to true if the attribute will carry more than one value for the same product */
           'autoSuggest' => false
]]);
   }
}- Wire the new datasource provider created in the previous step to unbxd feed providers in your di.xml file as shown below:
 <type name="Unbxd\ProductFeed\Model\Indexer\Product\Full\DataSourceProvider">
       <arguments>
           <argument name="dataSources" xsi:type="array">
               <item name="rating_productfeed_extension" xsi:type="object">Unbxd\ProductRating\Model\Product\DataSourceProvider\ProductRatingDataProvider</item>
           </argument>
       </arguments>
   </type>
Website Configuration
Using the Unbxd plugin via the Magento platform, you can integrate all the product features like Autosuggest, Search, Browse, and Recommendations in few easy steps.
The config has two properties named siteName & APIKey which is used by the SDK to identify the Unbxd site for the respective Magento store and environment (dev/stage/prod). You can take values rof the keys by referencing the UnbxdSiteName & UnbxdApiKey in the Unbxd console. The values are populated from the respective values configured in the setup section of Unbxd.
NotePrior to enabling Unbxd Features (Search/Autosuggest/Browse) ensure that the product feed is submitted and indexed with Unbxd.
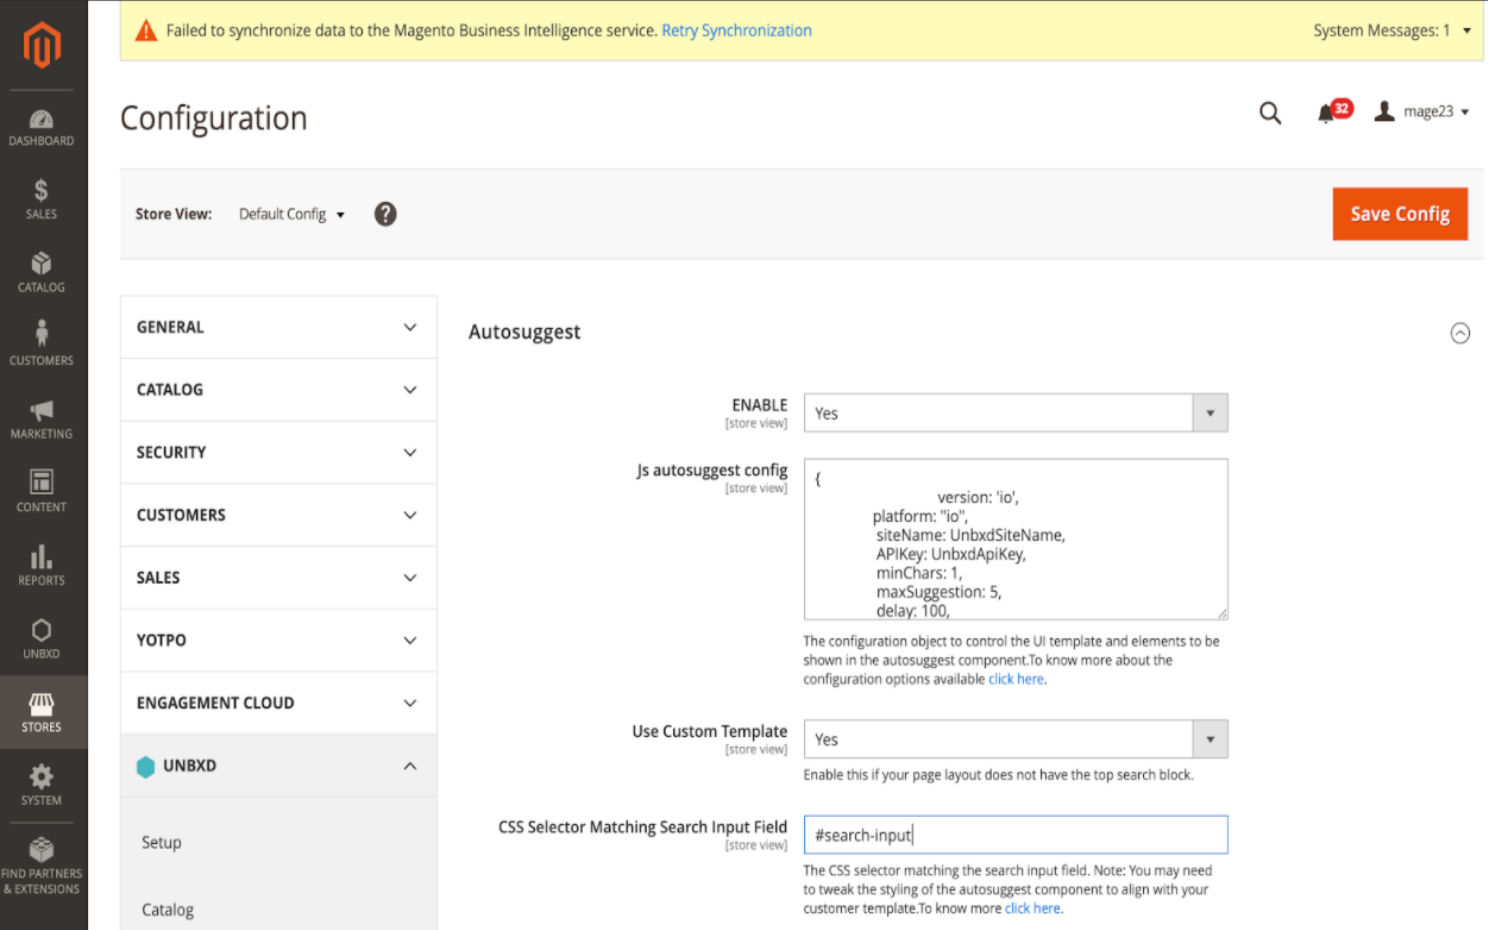
Autosuggest Configuration
After the catalog indexing is done, you can navigate to Unbxd > Website config and in the ‘Autosuggest’ section, enable the field value to ‘Yes’ to enable Autosuggest Feature. Autosuggest delivers suggestions as the shoppers’ type on the search bar of your site.
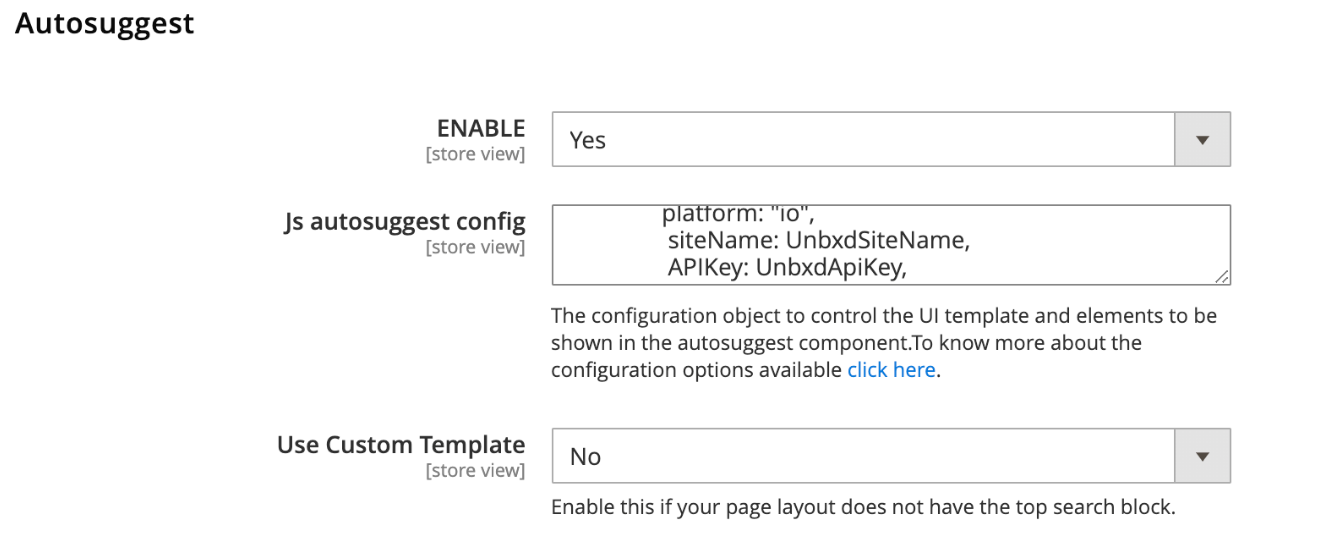
To know more about the Autosuggest SDK configs and the different possible options, click here.
- Enable Custom Template
If you are using a custom template with a different CSS selector for your Search input box, then select ‘Yes’ and populate the block with the field value, so that we can get that input from our JS onto the CSS selector.
- Search Configuration The Search features that let you power your site by Unbxd can be enabled in a Magento powered webshop by following the below steps:
- To enable the search feature, login into the admin console, navigate to Unbxd > Website config.
- In the search section, update the enabled field value to ‘Yes’. To know more about all the configs, click here.
- Browse Configuration
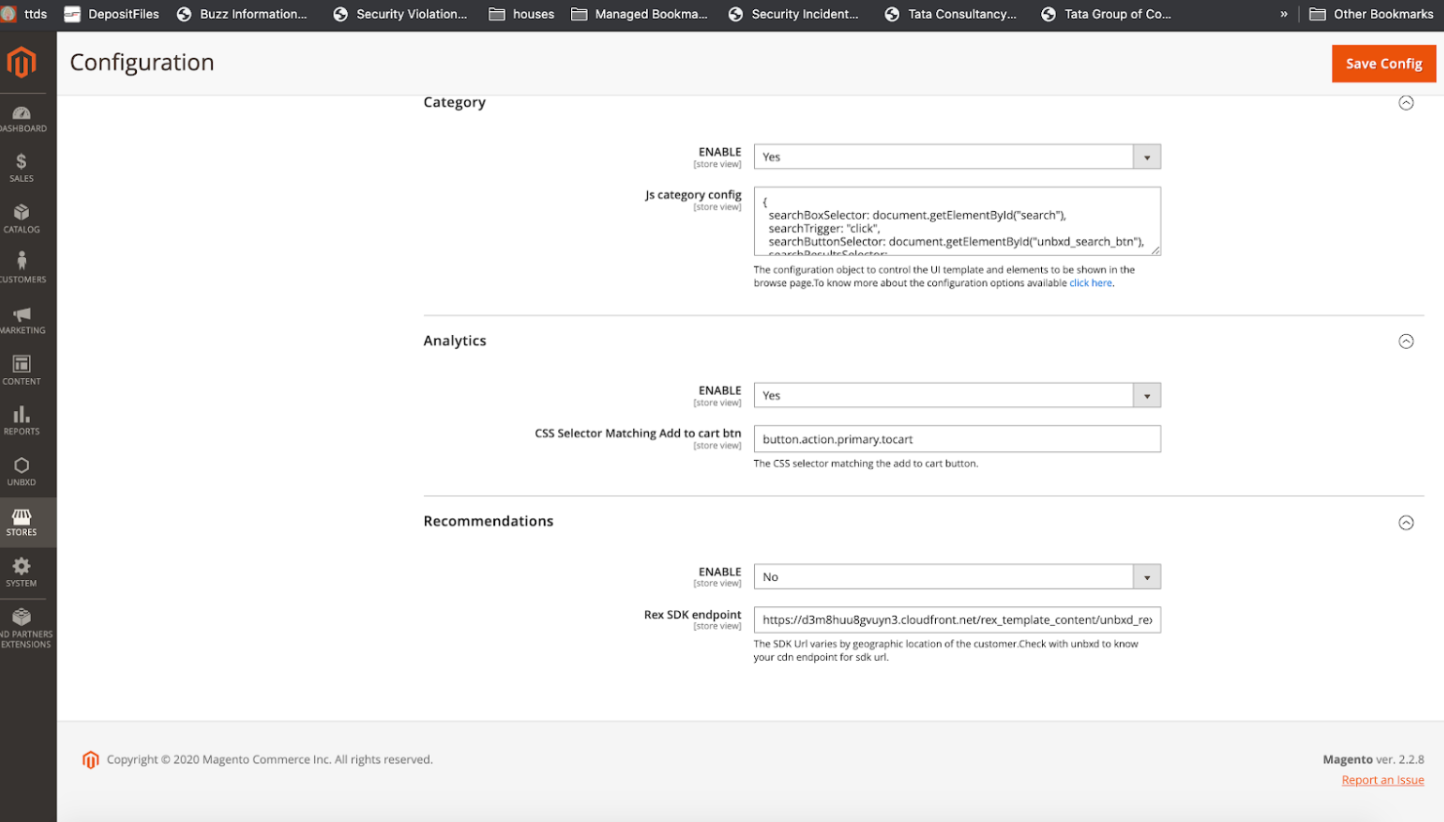
You can enable this feature to let your shoppers browse through your product categories. To enable the browse feature, login into the admin console, navigate to Unbxd > Website config.
In the Category section, update the enable field value to ‘Yes’.
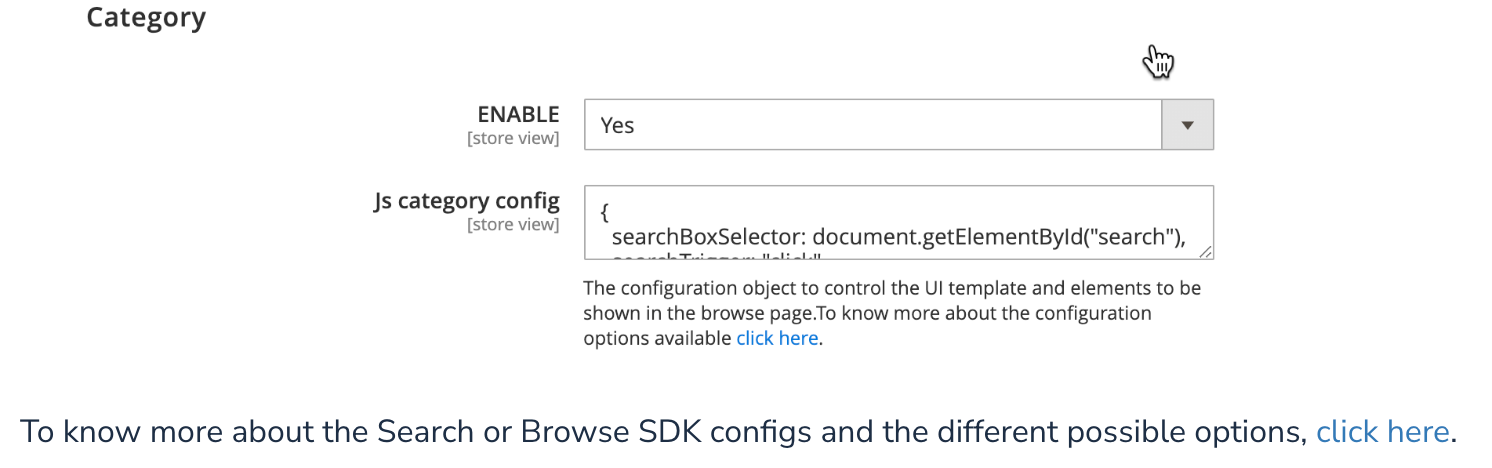
To know more about the Search or Browse SDK configs and the different possible options, click here.
Analytics Integration
Unbxd search tracks user behavior anonymously and uses machine learning algorithms to power personalized search results that are relevant and accurate. Analytics is built into your Unbxd Magento extension.
The extension helps us track and analyze user events, like product clicks, search queries, add to cart clicks, and successful orders. We then use this information to build a user profile that shows the user’s affinity towards a certain category, brand or price. This enables us to help you provide search results that are intuitive and relevant.
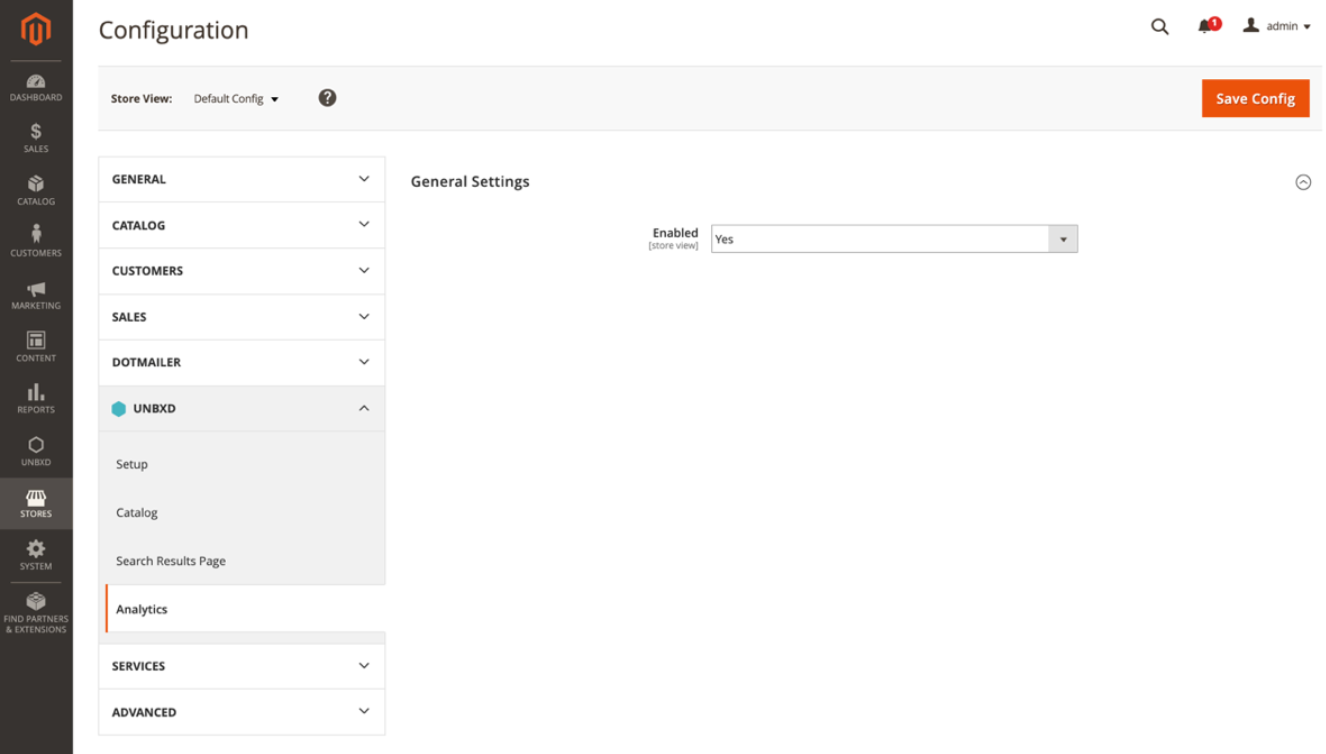
- To enable the Analytics feature, login into the admin console, navigate to Unbxd > Website config.
- In the Analytics section, update the enable field value to ‘Yes’.
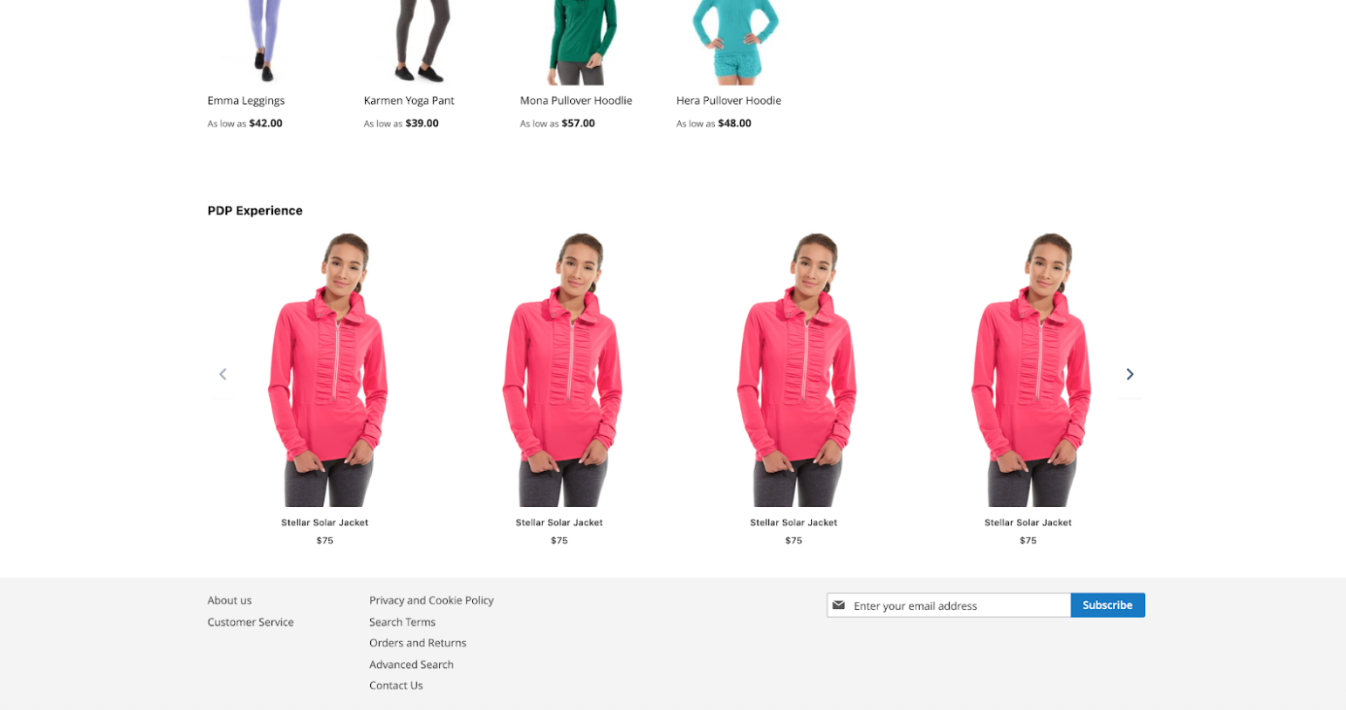
Recommendations Configuration
To enable recommendations on the web, it is a two-step process. Log in to the admin console and navigate to the Unbxd > Website Config > Recommendations
Create widgets and update them to the layout in the respective pages, for this Navigate to Create a widget of type “Unbxd Recommendation Products List”.
Create widgets and update them to the layout in the respective pages, for this
Navigate to Create a widget of type “Unbxd Recommendation Products List”.
Select the page type from the drop-down options (Product, Cart, Category, Home) , page type indicate which page the widget would be displayed.
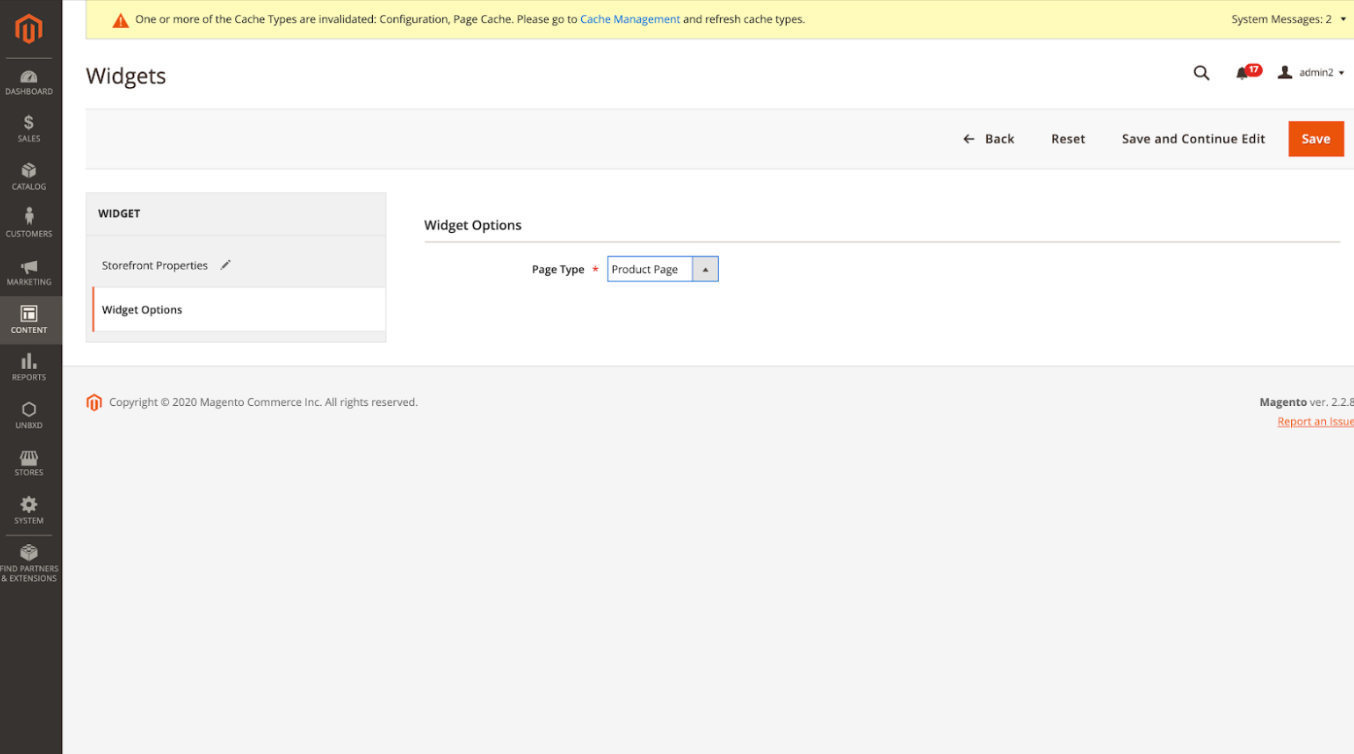
- Select the Content Elements> Widgets> Add Widget.
- Select container in which you have to put the widget. Update the layout on where this widget should be displayed in the product page,
Now the widget should be displayed on the page,
NoteYou can add up-to 3 widgets per page.
Custom Template
Unbxd Search JS plugin enables Unbxd powered Search, Browse, Recommendations, Autosuggest pages, and tracking of analytics events. To customize or extend the default template/layout and user experience, you may choose one of the following configuration options:
- Using JSON object:
You can modify Search/Browse/Autosuggest behavior by changing the configuration of the respective features available as a JSON object in the admin console.
Choose this option if your requirement is one of the following: (Refer to the Javascript library for a comprehensive list of all the available parameters):
✔️ Change the product card/tile (adding a link to wishlist, add to cart, overlays, etc)
✔️ Create hover on image effect
✔️ Update the default and number of products per page options
✔️ Update the sort option
✔️ Change the style of pagination (supports Fixed pagination, Infinite scroll, Click and scroll)
✔️ Customize the ‘Did you mean’ messages
✔️ Customize the look and feel of facets - Customize the stylesheet:
You can customize the features based on your requirements. For ex. if you wish to display Pagination on the bottom left than the standard top right, then customize the stylesheet which would override the Unbxd stylesheet. By default, our SDK inherits brand guidelines in case of conflict.
Note: Ensure that the custom stylesheet gets loaded before the Unbxd stylesheet (autosuggest.css & search.css). - Through extension:
Use this option if you intend to change the layout of the search widgets. Imagine, if you wish to display widgets of different Create an extension module using the starter template to extend the search/browse page layouts, the position of custom blocks in and around the main or side column:
Add your new layouts to templates/category/productresults.phtml (or) templates/search/productresults.phtml
Add your new stylings to web/css/search.css
To modify the arrangement of block & containers in the browse page update layout file catalog_category_view.xml
To modify the arrangement of block & containers in the search page update layout file unbxd_search_handle.xml
Indexing Queue View
To view the products added to the indexing queue, before the cron job or manual synchronization is triggered, use the Indexing Queue View within the Unbxd tab.
For example, every time a product is added/deleted/modified, a row will be created to record the change within the Indexing Queue.
The labels in the screenshot above are explained in the table below:
| Label | Description |
|---|---|
| ID | Indicates the unique identifier of the record. |
| Store View | Indicates the store related to reindex operation. |
| Created | Indicates the calendar date and time the specific Indexing queue entry was created. |
| Started | Indicates the reindexing start time of the catalog. |
| Finished | Indicates the reindexing end time of the catalog. |
| Status | Indicates the status of a catalog’s reindex operation. Possible values: Pending, Running, Complete, Error, Hold. |
| Pending | Default: Indicates the reindex entry was just created and is waiting to be processed. |
| Running | Indicates the catalog is currently being processed. |
| Complete | Indicates the catalog has successfully finished reindexing. |
| Error | Indicates the catalog has finished reindexing with errors. |
| Hold | Indicates the catalog’s reindexing is paused. This may also mean the reindexing may not resume. |
| Execution Time(s) | Indicates the duration of time (in seconds) the reindexing took to complete. |
| Affected Entities | Indicates the total number of products affected by reindexing. |
| Number of Entities | Indicates the total number of entities in the reindex process. |
| Action Type | Indicates the type of reindexing action for the entities. Possible values: Row reindex, List reindex, Full reindex. |
| Row reindex | Allows you to reindex only one product. |
| List reindex | Allows you to reindex a list of products. |
| Full reindex | Allows you to reindex an entire catalog. |
| Additional Information | Indicates the information related to reindexing. |
| Actions | Indicates actions you can perform on required cron job. |
| View Details | Redirects to separate UI layout with queue item details. |
| Hold | Sets the reindex operation to ‘Hold’. |
| Unhold | Releases reindex operation from ‘Hold’ status (switch to ‘Pending’ status). |
| Delete | Deletes reindex operation item from queue. |
| Log Viewer | Provides some operations with log file: |
| Log File Operations |
|
| Log File Details | The viewer displays the current log file location and file size (in KB). |
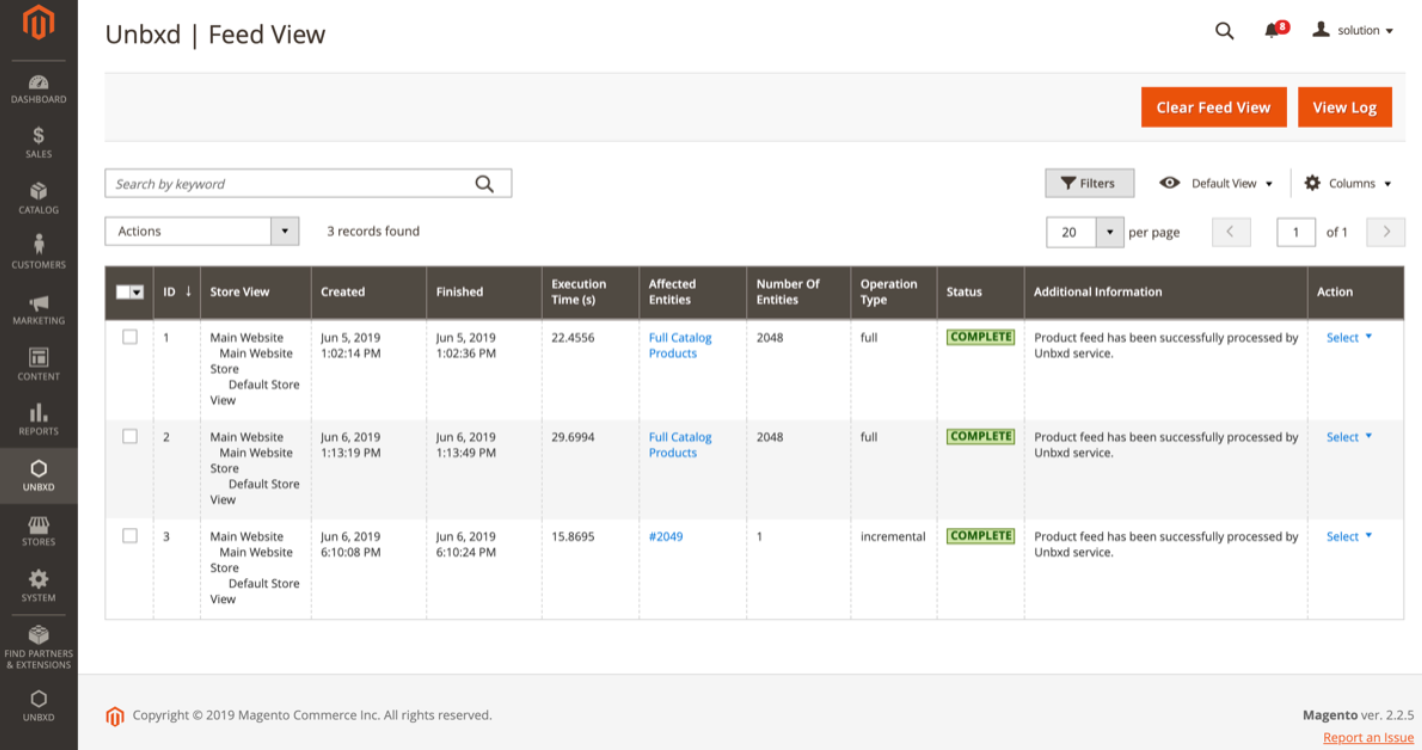
Feed View
The Feed View (Unbxd > Feed View) screen lists all your product catalogs and its upload status. Primarily it would tell you if the upload was full or incremental and if it successfully completed or not.
To view the description of the labels in the screenshot above, refer to the table below:
| Label | Description |
|---|---|
| ID | Indicates the unique identifier of the record. |
| Store View | Indicates the store related to the upload operation. |
| Created | Indicates the calendar date and time the specific upload queue entry was created. |
| Finished | Indicates the upload end time of the catalog. |
| Execution Time(s) | Indicates the duration of time (in seconds) the upload took to complete. |
| Affected Entities | Indicates the total number of products affected by the feed upload. |
| Number of Entities | Indicates the total number of entities in the upload process. |
| Operation Type | Indicates the status of a feed upload operation. Possible values: Running, Indexing, Complete.
|
| Additional Information | Indicates the information related to reindexing. |
| Action | Indicates the action available for the specific entity.
|
| Clear Feed View | Allows you to clear the Feed View queue. |
| View Log | Allows you to view the log file entries for the entire cron job. You can also download the log file, refresh the log entries, and clear the log. |
| Actions | Allows you to delete feed upload for multiple entities. |
| Filters | Allows you to create filters to refine the Feed View table. |
| Default View | Allows you to reset the Feed View table to its original settings. |
| Columns | Allows you to select the columns you want displayed in the Feed View table. |
| Log Viewer | Provides some operations with log file:
|
NoteThese endpoints are exposed taken directly from the plugin to avoid any discrepancy in case the Unbxd server is in APAC region
Exposing Endpoints
You can integrate API endpoints to directly upload full feed or delta feed, know the upload status, or check the size of the uploaded catalog.
NoteThese endpoints are exposed taken directly from the plugin to avoid any discrepancy in case the Unbxd server is in APAC region
Upgrade
Depending on the installation method you choose, you can upgrade the Unbxd extension in two ways:
- Manual Upgrade: If the extensions files are located within app/code/Unbxd, then the extensions were installed manually and you need to upgrade the extensions files manually. You will need to log into your Github account.
If you have installed the Unbxd extension via a direct file upload, you can upgrade manually:To upgrade manually:
- Download and install the latest version of the extension from the following Github locations:
UnbxdProductFeed
UnbxdAnalytics
UnbxdSearch - To download a related extension, click Clone or download > Download Zip. For more information on how you can download and install via a direct link, refer to Installation via direct file upload.
- Extract and replace all existing files. Login to the Secure Shell (SSH) console of your server, navigate to the Magento 2 root directory and run:
php bin/magento cache:flush
<br>php bin/magento setup:upgrade- If production mode is enabled, run:
php bin/magento setup:di:compile- To deploy content, run:
php bin/magento setup:static-content:deploy (use key –f if developer mode is enabled)
<br><span style="font-size: 16px;">php bin/magento cache:flush</span>
You have successfully upgraded using the direct file.
- Composer: If the extension files are located within vendor/unbxd/, then the extension was installed using the Composer and you need to use the Composer to upgrade.
If you have installed the Unbxd extension via the Composer, you can upgrade via the Composer as well.To upgrade via the Composer:
- Login to the SSH console of your server, navigate to the Magento 2 root directory and run:
composer update unbxd/*<br>php bin/magento setup:upgrade- If production mode is enabled, run:
php bin/magento setup:di:compile- To deploy content, run:
php bin/magento setup:static-content:deploy (use key –f if developer mode is enabled)<br><span style="font-size: 16px;">php bin/magento cache:flush</span>You have successfully upgrade via the Composer.
Note
- Create a backup (via System > Tools > Backup) before you upgrade.
- To perform this operation, in some cases, you need to setup your Magento 2 access keys. These would available in auth.json file located in your Magento 2 root directory. By default, Magento 2 provides auth.json.sample file located in root directory.
Uninstall
Depending on the installation method you choose, you can uninstall the Unbxd extension in two ways:
- Manual Uninstall: If the extensions files are located within app/code/Unbxd, then the extensions were installed manually and you need to uninstall the extensions files manually. You will need to log into your Github account. To uninstall manually:
- Login to the SSH console of your server, navigate to the Magento 2 root directory and check the list of related extensions including their enable/disable status:
php bin/magento module:status Unbxd_Search
<br>php bin/magento module:status Unbxd_Analytics- To disable the extensions, run:
php bin/magento module:disable Unbxd_Search
<br><span style="font-size: 16px;">php bin/magento module:disable Unbxd_Analytics</span><br><span style="font-size: 16px;">php bin/magento module:disable Unbxd_ProductFeed</span><br><span style="font-size: 16px;">You can also disable extensions via Module Manager (System > Web Setup Wizard > Module Manager)</span>- To remove files related to the extensions, run the following commands from Magento 2 instance root directory:
rm -rf app/code/Unbxd- for remove main extensions files
rm -rf val/log/unbxd- or remove log files:
-
Login to the MySQL server where the Magento 2 instance database is located.
-
To remove all tables related to the extensions:
Login to the MySQL server where the Magento 2 instance database is located.
To remove all tables related to the extensions, run:
SET FOREIGNKEYCHECKS=0;
DROP TABLE IF EXISTS unbxdproductfeedindexingqueue;
DROP TABLE IF EXISTS unbxdproductfeedfeedview;
SET FOREIGNKEYCHECKS=1;
To remove module configuration settings from coreconfigdata table, run:
DELETE FROM coreconfigdata WHERE path LIKE ‘%unbxd%’;
To remove module from setupmodule table, run:
DELETE FROM setupmodule WHERE module LIKE ‘Unbxd_%’.Run
php bin/magento setup:upgrade
If production mode is enabled,runphp bin/magento setup:di:compile -
To deploy content, run:
php bin/magento setup:static-content:deploy(use key –f if developer mode is enabled)
php bin/magento cache:flush
You have successfully uninstalled the Unbxd extension.
- Composer: If the extension files are located within vendor/unbxd/, then the extension was installed using the Composer and you need to use the Composer to uninstall.
If you have installed the Unbxd extension via a direct file upload, you can uninstall manually.
To uninstall via the Composer:
Login to the SSH console of your server, navigate to the Magento 2 root directory and check the list of related extensions including their enable/disable status:
php bin/magento module:status Unbxd\_Search\
php bin/magento module:status Unbxd\_Analytics
php bin/magento module:status Unbxd\_ProductFeed
To disable the extensions, run:
php bin/magento module:disable Unbxd_Search<br><span style="font-size: 16px;">php bin/magento module:disable Unbxd_Analytics</span><br><span style="font-size: 16px;">php bin/magento module:disable Unbxd_ProductFeed</span><br><span style="font-size: 16px;">You can also disable extensions via Module Manager (System > Web Setup Wizard > Module Manager).</span>To remove files related to the extensions, run the following commands from Magento 2 instance root directory:
php bin/magento module:disable Unbxd_Search<br><span style="font-size: 16px;">php bin/magento module:disable Unbxd_Analytics</span><br><span style="font-size: 16px;">php bin/magento module:disable Unbxd_ProductFeed</span><br><span style="font-size: 16px;">You can also disable extensions via Module Manager (System > Web Setup Wizard > Module Manager).</span>The -r flag removes extension data.
To remove extensions log files,
run rm -rf var/log/unbxdTo remove modules from composer and clean up the database and code, run the following commands after modules have been successfully uninstalled:
composer remove unbxd/*<br>php bin/magento setup:upgradeIf production mode is enabled, run
php bin/magento setup:di:compileTo deploy, run:
php bin/magento setup:static-content:deploy (use key –f if developer mode is enabled)<br><span style="font-size: 16px;">php bin/magento cache:flush.</span>You have successfully uninstalled the Unbxd extension via the Composer.