SAP Hybris
Integrate Netcore Unbxd with SAP Hybris to enhance product discovery, synchronize catalogs, and track user behavior with minimal developer effort, including feed and analytics integration.
Overview
Netcore Unbxd Hybris Plugin allows you to use the Unbxd plugin within your SAP Hybris website, integrating all the product discovery features with minimal developer intervention. This section will help you install the Unbxd extension, synchronize the product catalog, and integrate analytics.
| Feature | Description |
|---|---|
| Automatic Catalog Sync | Automatically synchronizes product additions and deletions with Unbxd servers based on a predefined schedule, keeping the data up-to-date. |
| Analytics Integration | Tracks user behavior (product clicks, cart additions, orders) and builds user profiles based on affinity to categories, brands, or prices, enhancing search result accuracy. |
NoteThe plugin is currently developed on SAP Commerce version 6.6. However, the plugin will support all Commerce versions from 6.0 to 2211 (latest release)
Installation
Integration of Unbxd plugin within SAP hybris application can be done for Feed and Analytics.
Feed Integration
To install Unbxd plugin, follow the steps below:
- Download the SAP Hybris module from GIT directories.
- Unzip the module & copy
/hybris/bin/custom to /hybris/bin/custom - Open
/bin/config/localextensions.xmland add the mentioned code:
<extensions>
  . . . . .
  <extension name='unbxd' />
  <extension name='unbxdBackoffice' />
  <extension name='unbxdanalytics' />
</extensions>- After that,
Open /bin/config/local.propertiesand add the following keys:
unbxd.sitekey.<index name>=<YOUR UNBXD SITE KEY>
unbxd.secretkey.<index name>==<YOUR UNBXD SECRET KEY>
unbxd.apikey.<index name>==<YOUR UNBXD API KEY>
To get the index name, navigate to Search Console and Navigation > Facet Search Configuration > Properties > Index Name Prefix.
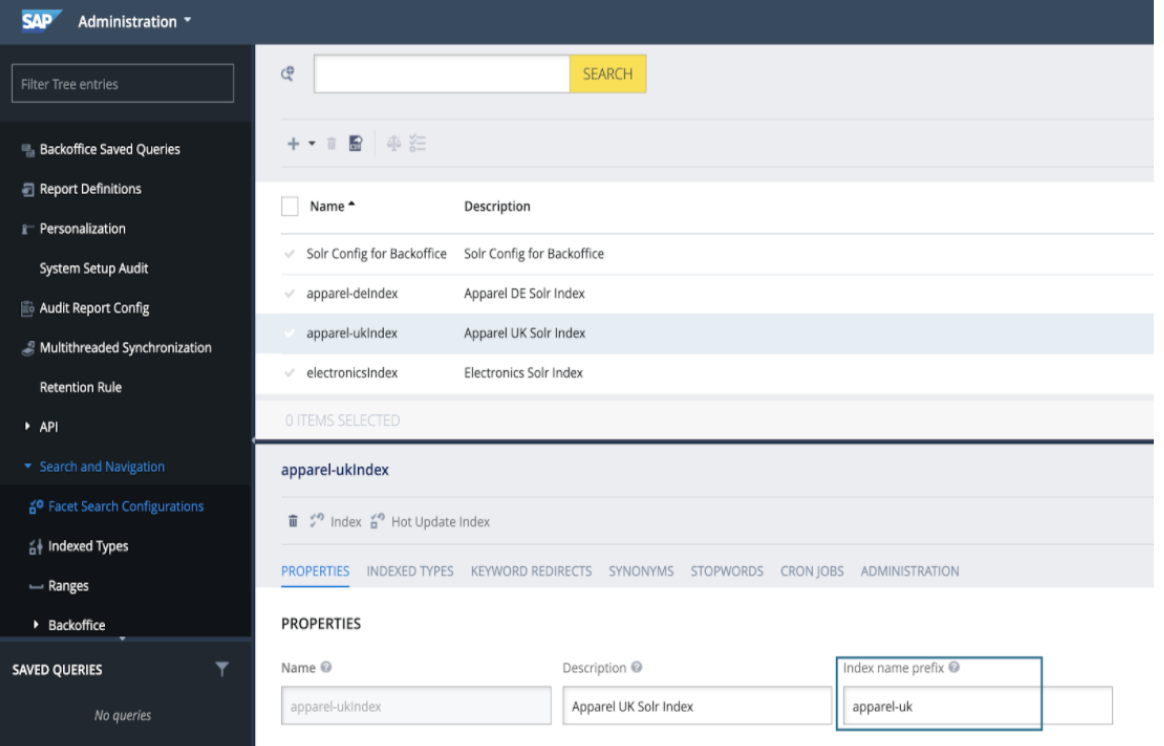
Set up Name Prefix
- Rebuild Hybris Solution by running the following command:
$ cd /bin/platform<br>$ ant clean all && ant updatesystemAnalytics Integration
For Analytics integration, add the below code
unbxd.analytics.sitekey.<base store name>=DevHybris801271569422411Base store name can be found in Backoffice at node Base Commerce > Base Store. The analytics plugin needs to be installed as an addon on top of the hybris storefront plugin. You need to run the following command:
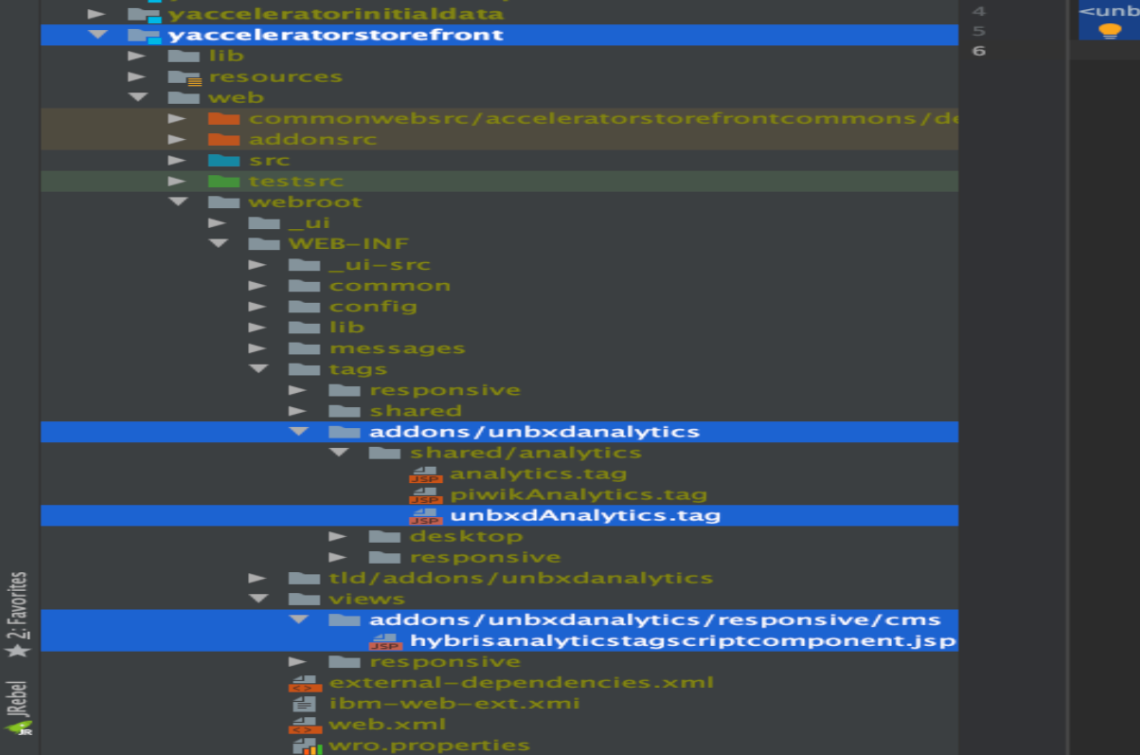
ant addoninstall -Daddonnames="unbxdanalytics" -<br>DaddonStorefront.yacceleratorstorefront="yacceleratorstorefront"
NoteNOTE: in the above command, yacceleratorstorefront is a storefront plugin that needs to be replaced with the storefront extension name of your installation.
Once you rebuild the solution. You can see that unbxdanalytics related files are copied in your storefront plugin. When we run the above command and rebuild hybris unbxdAnalytics, addon files are copied into the yacceleratorstorefront.
After the whole process, restart the server.
For Linux users:
$ cd <HYBRIS-INSTALL-ROOT-DIR>/bin/platform<br>$ ./hybrisserver.sh stop<br>$ ./hybrisserver.sh startFor Windows users:
C:> cd <HYBRIS-INSTALL-ROOT-DIR>\bin\platform<br>C:> hybrisserver.bat stop<br>C:> hybrisserver.bat startConfiguration
Configuration of Catalog Index
To configure SAP Commerce with Unbxd plugin, you have to sync the data properly. SAP uses ‘Apache Solr’ to index the products.
Therefore, to change syncing of data from Solr to Unbxd, ‘isUnbxd’ attribute in the Indexed Type needs to be set to ‘true’.
To do this, follow these steps:
Login to BackOffice:
Access backoffice: https:///backoffice
Username: ****Password: *****
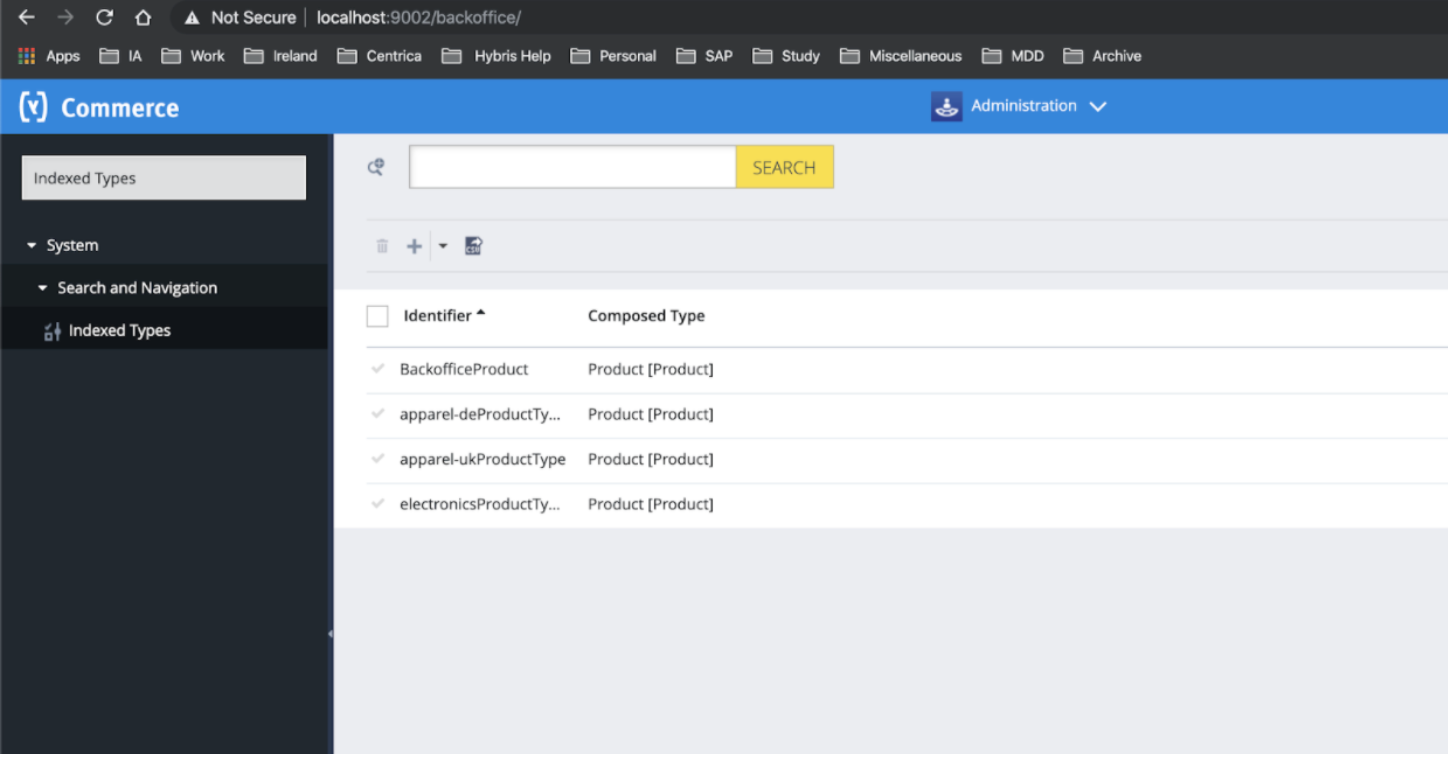
Search for Indexed Types or navigate to ‘Search and Navigation’ > Indexed Types. Choose the catalog that you wish to edit.
Under the ‘Administration’ tab, change the value of ‘isUnbxd’ attribute in the UNBOUND section to ‘true’.
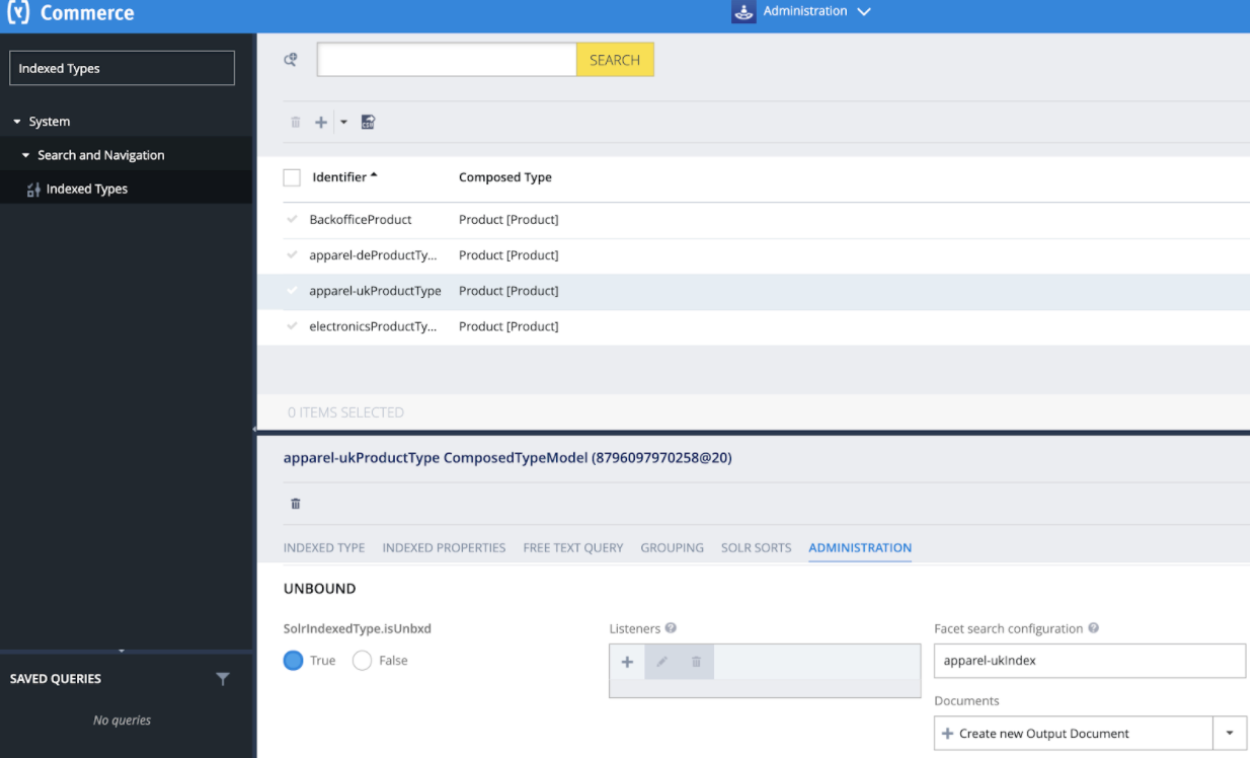
Once done, click ‘Save’. The selected catalog will get synced with Unbxd.
Configuration of Attribute Index
This allows you to index the attributes that you want to include in the product feed. To enable:
In the ‘Indexed Properties’ tab, choose the attribute that you wish to edit by clicking ‘Edit Details’.
Go to the ‘Administration’ tab, select the value of ‘isUnbxd’ attribute to true or false depending on your choice to include or ignore this property/field in the catalog respectively.
If you wish to include the field in your response, then change the value of ‘Include in Response’ to ‘True’ or ‘False’.
Configure Feed
Once installed, you need to authenticate your Unbxd extension using your Unbxd account keys (also known as Authentication Keys).
You can sync the product catalog with Unbxd in multiple ways:
- Full Feed Upload
- Delta Feed Upload
- Single Feed Upload
Full Feed Upload
It allows you to upload the full version of your schema and catalog files. You can configure it by navigating to back office.
Back-Office Configuration
You can also select products to synchronise by navigating to the back office. To configure:
Go to Backoffice in the right panel of options.
Search for ‘Facet Search Configuration’.
Choose the relevant configuration for your index & Click on the ‘Index’ button.
Once you click on ‘Index’, you will be presented with a dialog box with 3 different options to run on the index. Choose the option and Click ‘Start’.
NOTEFull option to run full catalog feed & Update option to run delta feed.
Incremental Feed Upload
It allows you to update on the product feed of your schema and catalog files.
If you click ‘Update’, you get to make incremental updates on the product feed.
Back-office navigation
You can select products to synchronise by navigating to the back office. To configure:
Go to System> Search and Navigation> Facet Search Configuration in the right panel of options.
Select a catalog.
Choose the relevant configuration for your index & Click on the ‘Index’ button.
Then ‘Update’ the products.
Single Feed Upload
You can either perform ‘Hot Indexing’ on a selected list of products or on individual products.
Hot Indexing
To run indexing on a selected list of products, choose the ‘Hot Index’ option.
- Navigate to ‘Facet Search Configurations’ and select a catalog.
- Click ‘Hot Update Index’ and choose the Item type ‘Product’ and click ‘Next’.
- In the next screen, choose the products that you wish to sync and press ‘Start’.
Once done, the product/s is/are added to the catalog with the updated fields.
Product Synchronization
Another way to directly sync the products is:
Login to Backoffice and navigate to the Unbxd plugin.
Click ‘Product Synchronization’. This will show the list of all the products in the selected catalog.
Select a product and click the ‘Unbxd’ icon on the top navbar.
A pop-up window opens that asks you to push the selected product to the online stage. Select the product and click ‘Sync’.
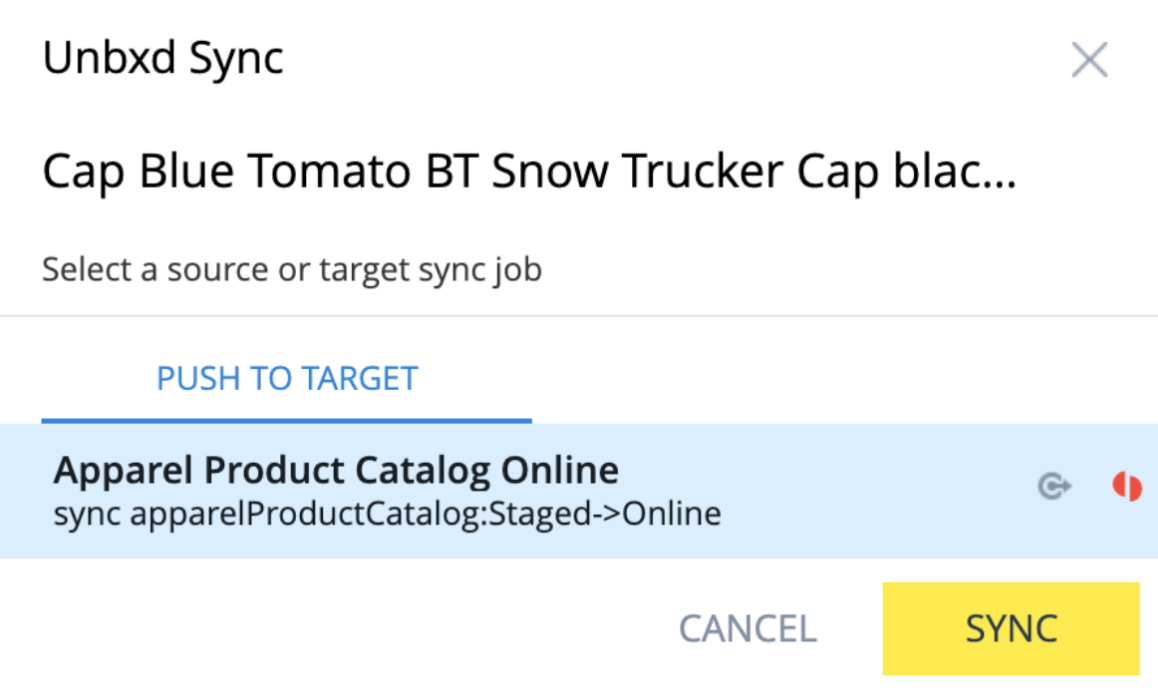
Once done, your selected product/s will be added to the catalog with updated values.
Cron Job
Cronjobs are automatically created at the ‘Hybris’ end. To create a cronjob,
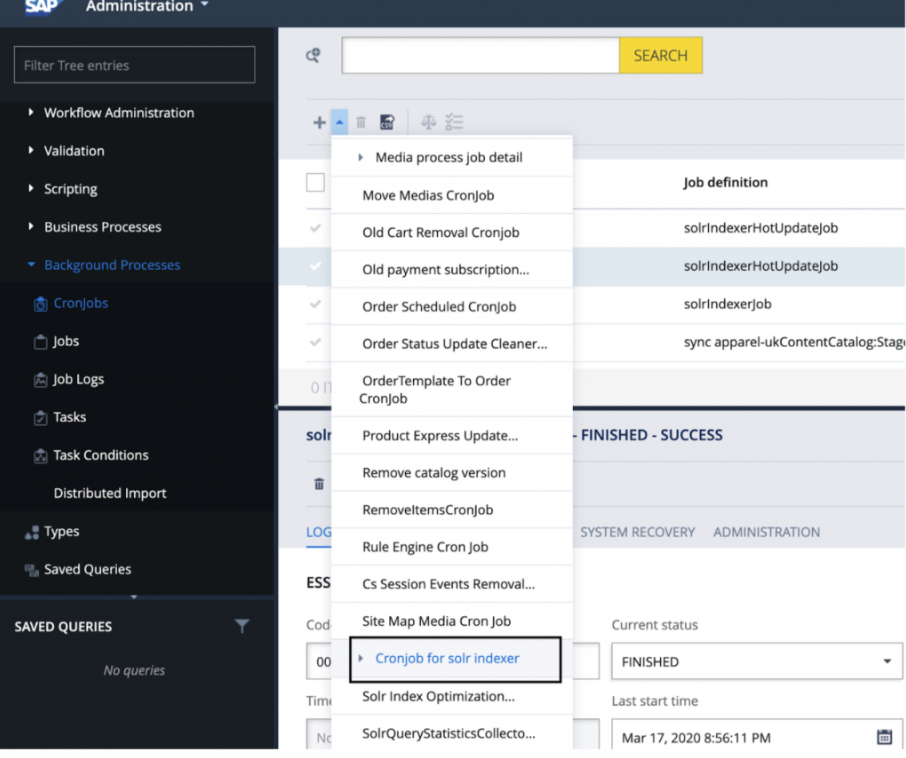
Use the wizard pop up window to configure the settings for your cronjob.
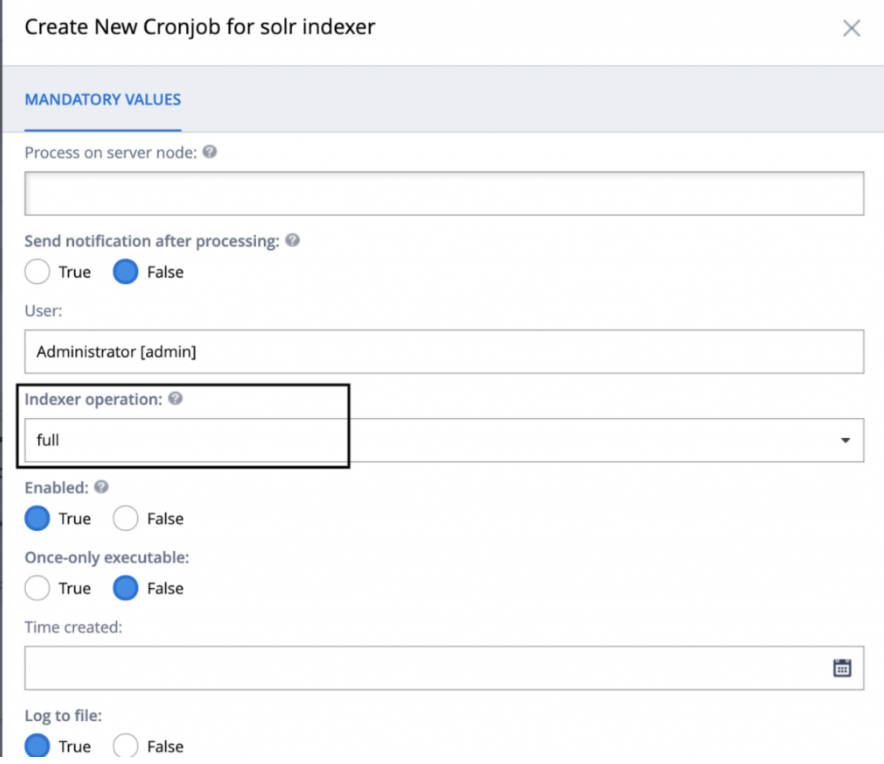
Configure the settings
- Code: a unique code for your cronjob, that makes it easy to distinguish. Example: full-electronicsIndex-cronJob
- Indexed Type: a type to be indexed. Example: Product.
- Indexer Operation: the manner of indexing. To perform the full indexing you need to select full.
- Query: a query used for indexing. Example: select PK from Product .
- Solr configuration: facet search configuration the cronjob applies to.
- Job definition: a definition containing settings for a particular job. Select solrIndexer Job
To change the setting of existing cronjob:
Click the cronjob entry to see its details.
As you can see, the cronjob settings are grouped in tabs.
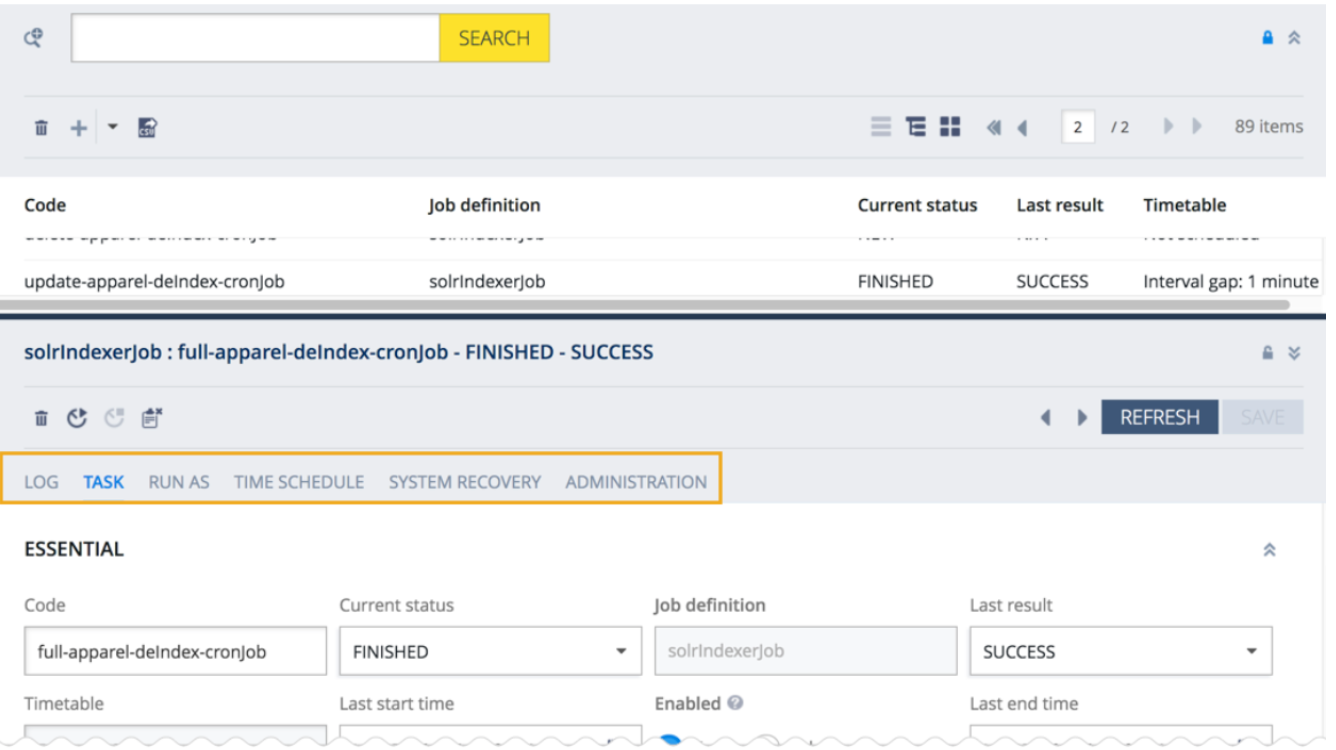
Each tab features the Essential section, where you can find the general settings for your cronjob. In this section you can find information specific to a particular tab:
- Log: Information about the logs and job steps. More details about the logs:
- Task: Indexer specific information and notification settings.
- Run as: Options that allow you to run the task as a defined user or with defined defined session attributes, specify a dedicated server node to run the task (to optimize the load balancing) and choose the priority of the task.
- Time Schedule: Settings allowing you to specify one or multiple time slots to run this task in, or you can run the task immediately.
- System Recovery: Settings allowing you to specify whether the system should recover after the changes.
- Administration: Advanced configuration options.
Running a CronJob
You have two options to run a cronjob: you can either start the cronjob right away or schedule it using a particular time slot.
To schedule a cronjob:
- Go to the Time Schedule tab.
You can see the Schedule section where you can specify one or multiple slots to run this task. - Click the Create new Trigger button. A wizard window pops up.
Fill in the fields to provide mandatory information about the schedule. The name of the cronjob is already filled in for you. - Click Done to finish scheduling.You have successfully configured basic settings for a cronjob trigger. To add more specific settings, select the trigger from the list and double-click it to open the editor.

Features
Once you have added the Unbxd plugin, you can see these three options:
Product Synchronization
The Product Synchronization section lets you upload and synchronize your products in the catalog. When you click this option, you can see the number of products from the selected catalog that have been added.
Navigate to Unbxd > Product Synchronization to see the list of products. Under ‘Catalog Version’, you can see the catalog name that has been selected with the version status as either ‘Staged’ or ‘Online’.
Staged version– In this version, you can make changes to the product attributes like description, images, or price. This is just a staging version of changes to avoid making mistakes before taking it live.
Online version– This is the version that is visible to the end-users. Once the changes are made for a product, you can sync it to make it visible online.
Under Unbxd Uploads tab, you get to know all the details related to the catalog upload. The details range from the time of upload, file name, private key for authentication, and status. The various fields are:
- UnbxdUploadTask.timeStamp describes the date and time of the catalog upload.
- UnbxdUploadTask.fileName refers to the name of the uploaded file.
- UnbxdUploadTask.uploadId is a unique ID provided to every catalog upload.
PK is the private key assigned to all the catalogs for access.
In case, you want to make a Delta Feed Upload that includes a few products from the catalog, then change the status of UnbxdUploadTask.isDelta= TRUE.
You can check the number of catalogs that have been uploaded by the Unbxd plugin. Once the catalog is uploaded, the UnbxdUploadTask.status changes to UPLOADED.
Uninstall
If you want to remove the hybris plugin from your system, you can uninstall Hybris by the following steps:
Open <HYBRIS-INSTALL-ROOT-DIR>/bin/config/localextensions.xml, remove the code lines:
<extensions>
  . . . . .
  <extension name='unbxd' />
  <extension name='unbxdBackoffice' />
  <extension name='unbxdanalytics' />
</extensions>
Open <HYBRIS-INSTALL-ROOT-DIR>/bin/config/local.properties, remove the keys:
unbxd.sitekey=<YOUR UNBXD SITE KEY>
unbxd.secretkey==<YOUR UNBXD SECRET KEY>
unbxd.apikey==<YOUR UNBXD API KEY>
For uninstalling Analytics, remove the analytics keys.
unbxd.analytics.sitekey.default=DevHybris801271569422411Analytics plugin needs to be uninstalled as an addon from of hybris storefront plugin. You need to run below command:
Here “yacceleratorstorefront” is storefront plugin it needs to be replaced with the storefront extension name of your installation.
ant addonuninstall -Daddonnames="unbxdanalytics"\
-DaddonStorefront.yacceleratorstorefront="yacceleratorstorefront"
Rebuild Hybris Solution by running below command
$ cd <HYBRIS-INSTALL-ROOT-DIR>/bin/platform
$ ant clean all && ant updatesystem
Restart the server
- For Linux users:
$ cd \<HYBRIS-INSTALL-ROOT-DIR>/bin/platform  
$ ./hybrisserver.sh stop
$ ./hybrisserver.sh start- For Windows users:
C:> cd <HYBRIS-INSTALL-ROOT-DIR>\bin\platform
C:> hybrisserver.bat stop
C:> hybrisserver.bat start