Promotions
Learn how to strategically control product placement on Search Results Pages with promotions.
Overview
The Promotions feature in the Netcore Unbxd Self Serve Console allows retailers to strategically control product placement on Search Results Pages (SRPs). By leveraging this tool, businesses can prioritize or hide products, pin or slot items in specific positions, and organize listings to align with marketing goals. Promotions enhance user experience and drive sales by ensuring that relevant and high-priority products get the visibility they deserve.
Prerequisites
Before setting up promotions, ensure the following are in place:
- Complete Product Catalog is uploaded and updated.
- Ensure product attributes are accurate and comprehensive to create effective promotion rules.
- You have the required access to the Netcore Unbxd Self Serve Console with merchandising privileges.
Promotion Strategy
Utilize Netcore Unbxd following Promotional strategies to target merchandising tactics to prioritize, organize, and test product visibility to maximize engagement and sales.
| Strategy | Description | Example |
|---|---|---|
| Boost Products | Raise priority for specific products to appear higher in search results. | Outdoor gear store boosts “insulated water bottles” for “camping essentials” searches. |
| Bury Products | Hide irrelevant or unwanted products from specific searches. | Beauty store hides products with animal ingredients when users search “vegan.” |
| Pin Products | Fix products to specific positions in search results. | Fashion retailer pins “winter coats” at the top for “outerwear” searches. |
| Slot Products | Assign multiple products to fixed ranks in search results for strategic placement. | Electronics store slots “noise-canceling headphones” in top positions for “headphones.” |
| Sort Listing Page | Organize products by attributes like price or alphabetical order. | Furniture store sorts products A-Z by brand for easier navigation. |
| A/B Testing | Experiment with different merchandising strategies to find what drives best engagement. | Test promoting new arrivals vs. best-sellers for the same query. |
| Landing Pages | Create custom pages for themes or promotions to showcase relevant products together. | “Back to School” page featuring backpacks and stationery |
Types of Promotion Rules
- Global Rule
Applies universally to all queries and segments. Only one per site. Automatically created when the site is set up. It supports Boost/Bury or Filter strategies. - Query-Specific Rules
Tailored to specific search queries or customer segments. Supports Boost/Bury, Sort, Pin, Slot, and Filter strategies. Query-specific rules override Global Rules.
Example: Global Rule boosts “Summer Dresses” everywhere, but a query-specific rule for “Winter Sale” hides them.
How to Use Promotions

Navigate to Promotions
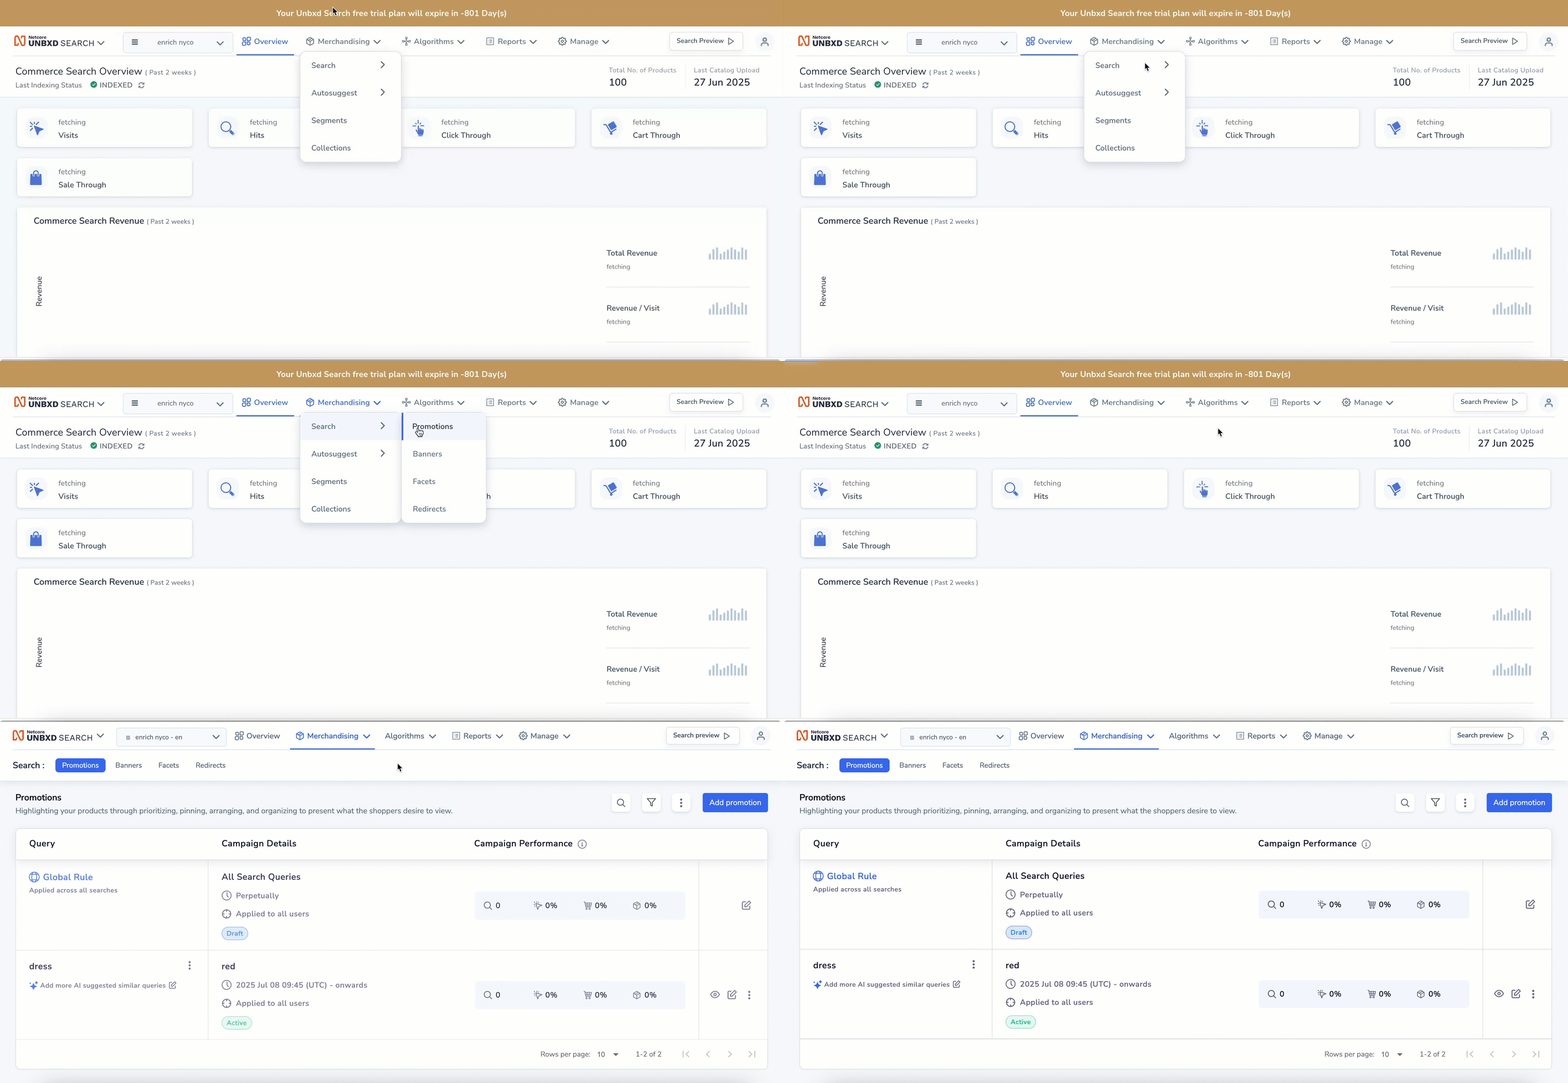
Log in to the Netcore Unbxd Console. Select the site you want to put the strategy and navigate to Merchandising > Search > Promotions.
You can perform following actions from the Promotions overview page. You can perform the below actions:
| Action | Description |
|---|---|
| Create | Design and set up a new promotion campaign or offer from scratch. |
| Edit | Modify the details or parameters of an existing promotion to optimize performance. |
| Publish | Activate the promotion, making it live and visible to customers. |
| Preview | Review how the promotion will appear to users before going live. |
| Duplicate | Copy an existing promotion to quickly create a similar campaign with slight variations. |
| Stop | Pause or terminate an ongoing promotion to prevent further customer exposure. |
| Bulk Upload | Upload multiple promotions or promotional assets at once to streamline campaign setup. |
| Export to email | Share promotion details or reports via email for collaboration or review. |
| Import Rule | Bring in predefined promotion rules or criteria from external sources for consistency. |
NoteAvoid using overlapping active campaigns for the same query and segment to prevent conflicts.
View and Manage Campaigns
- View All Campaigns
Navigate to Merchandising > Search > Promotions to view all launched campaigns. Campaigns are grouped by query and show details like date range, applied segment, current status, type (Merchandised Page or Landing Page), and campaign performance data. - Search Campaign
To find a campaign/query using Filters use the search bar to find campaigns by entering the associated query or apply filters based on status, page type, date range, created by, segment, or collection to narrow your search. - Summary of the rules added to campaign
Click the Eye icon next to the campaign to view a summary of the rules applied.
Edit and Modify Campaigns
- Edit an existing campaign
Locate the campaign and click the Edit icon to make necessary changes. After editing, click Publish rule to make the campaign live. - Applying the same rule to additional queries
Click the More options icon, select + Apply same rule to more queries, and add the additional queries. The rules from the original query will apply to the new queries. - Create new campaigns for the same query
Duplicate an existing campaign or create a new one for the same query. Creating a new campaign requires configuring rules from scratch, while duplicating carries over existing rules. - Duplicate existing campaigns
Click the More options icon, select Duplicate Rule, and a copy of the campaign will be created. You can then edit the new campaign and save it as a draft or publish it. - Stop active campaigns
Locate the campaign, click the More Options icon, and select Stop promotions to stop it from being live.
Campaign Preview and Testing
- Preview the site with the campaign rules applied
Click the More options icon and select Search preview to view the campaign results on a preview site. - Customize the quick preview
Access Performance Metrics and Insights by clicking the More Options button to toggle between Site Performance and Query Performance, and choose between List View or Grid View to display products.
Bulk Actions
- Bulk upload Promotion rules
Use the Bulk Upload Promotions option under More Options to upload promotion rules via a JSONL file. The file can be uploaded by dragging or browsing, and you can choose to override existing rules. - Import campaigns from one site to another
Use the Import Rule option under More Options to import campaigns from one site to another. You can select the source site, review campaigns, and click Import. - Export existing campaigns
Click Export to Email under More Options to receive a JSON file with your campaign data via email.
Campaign Performance and Analytics
- Access campaign performance data
On the Promotion overview page, find the overall campaign performance. For product-specific performance, use Quick Preview to view Site Performance and Query Performance metrics. - View product-specific performance
In the Quick Preview page, enable Site Performance and Query Performance to view key metrics for individual products and how they performed for specific queries.
Delete Campaigns
- Delete an existing campaign
Locate the campaign, click the More options icon, and select Delete Rule to remove it.
Create New Promotion

Rule Inheritance
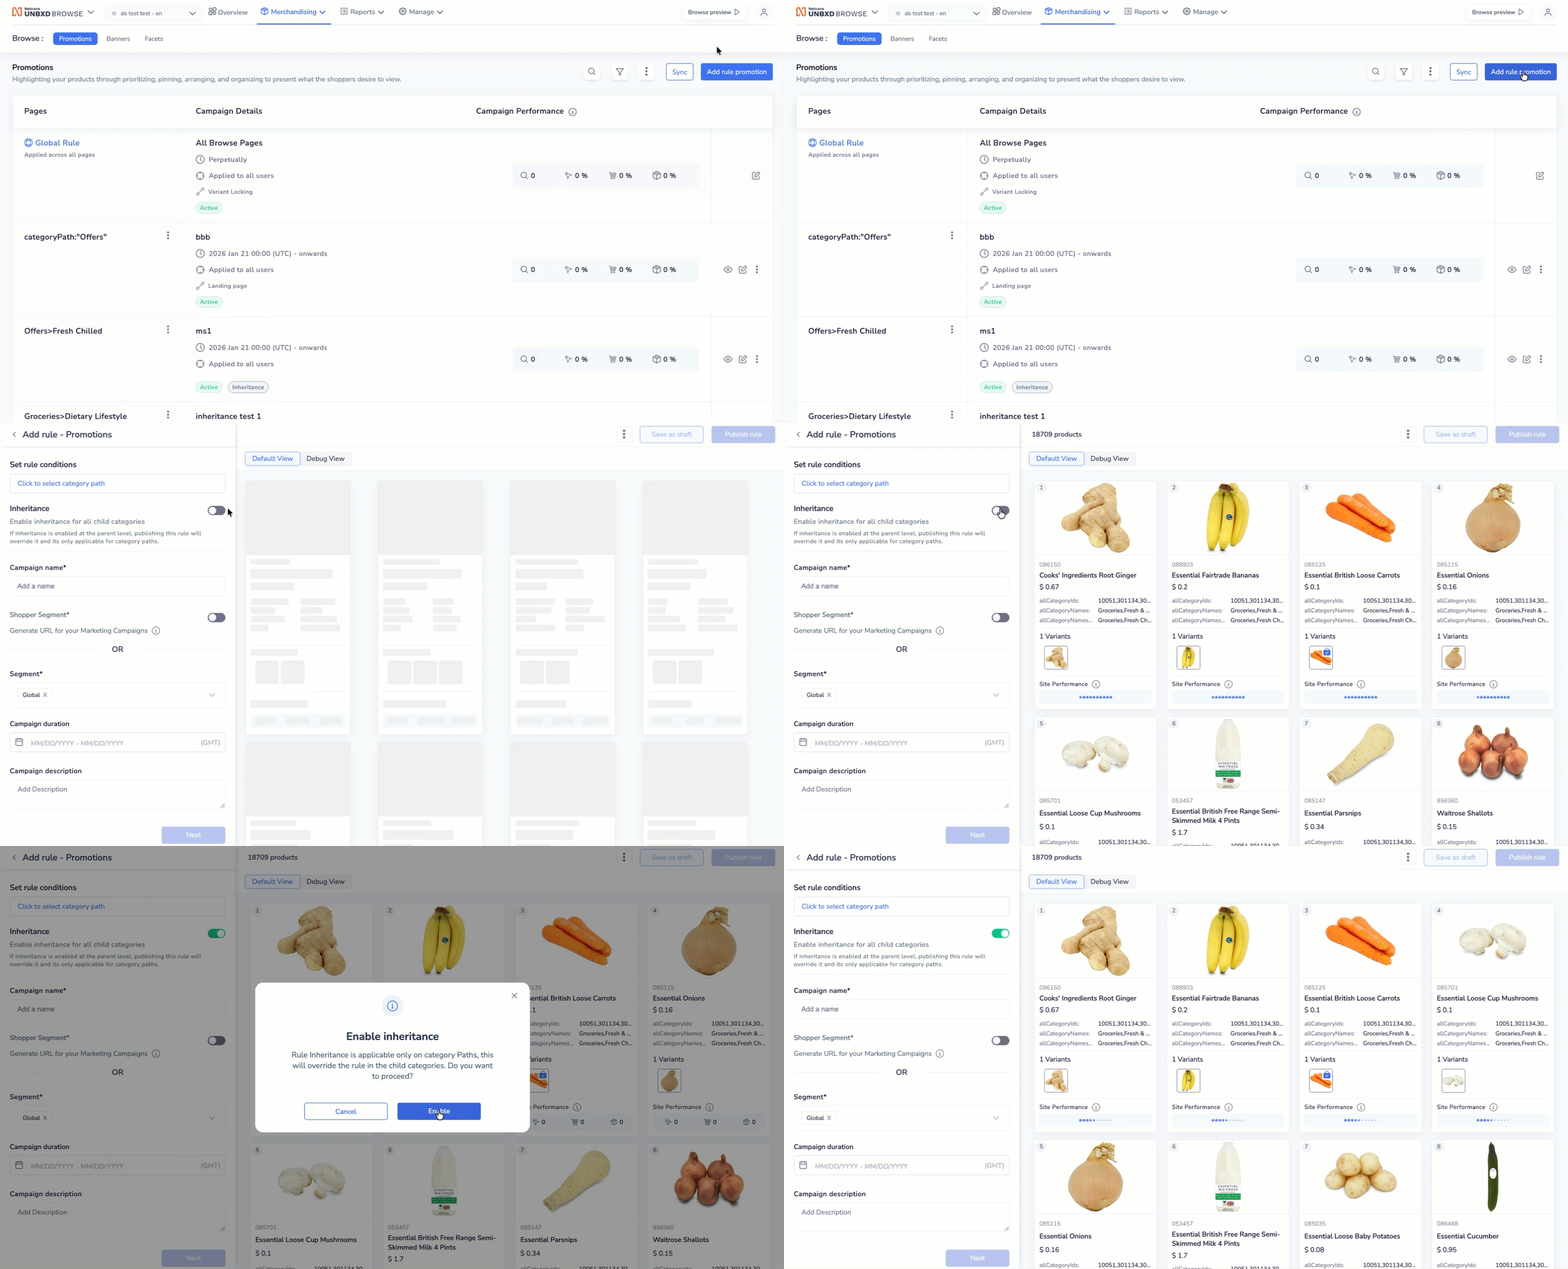
The Rule Inheritance feature lets you (merchandiser) automatically apply promotion rules set at the parent category level to all its subcategories.
Follow the steps given here to enable **rule inheritance** in the Browse section:
Query-specific merchandising rules allow you to customize promotions for specific queries or segments, offering a more targeted approach to shopper engagement. Navigate to Merchandising > Browse > Promotions > Add promotions. The following parameters must be filled in.
Parameter | Description |
|---|---|
Query | Define the search query (e.g., winter boots) that will trigger the redirect. |
Campaign Name | Assign a name to the promotion rule. |
Segment | Specify the user segment this promotion applies to or click + Create New Segment to make a custom/new one. |
Campaign Duration | Set the time period during which the promotion will be active. For an open-ended campaign, enable Run Perpetually. This option allows you to run any campaign until it is manually stopped. |
Campaign Description | Provide a brief description of the promotion’s purpose. |
NoteAs you update the Query name, the instant preview will display products relevant to the query and show the total number of applicable products.
Create Landing Pages (Optional)
Landing Pages are dedicated custom results pages built for specific queries. Merchandiser-driven landing pages offer full control, letting you access your entire catalog, override algorithms, and curate the search results using merchandising strategies.
- To create landing pages, toggle the option to green. Once enabled, the preview section will display all the products in your catalog.
If you prefer to add customizations on top of the search results produced by Netcore Unbxd AI and don't want to access your complete catalog, you can proceed without enabling the Landing Page option (keep it in its default disabled state).
Set up A/B test (Optional)
You can enable the A/B test option to compare two strategies you’ve curated or pit your merchandising strategy against Netcore Unbxd's default result set.
- Traffic split: Choose how to divide traffic between variations, with options like 50-50, 60-40, or 70-30. Ensure the total equals 100%.
- Select a KPI: Determine the key metric to decide the winning strategy. Use the Winner is decided by drop-down to choose from Click Rate, Average Order Value, Revenue Per Visit, Conversion Rate, or Cart Rate.
- Set test duration: Specify the test duration, which should be shorter than the overall campaign timeline.
- Fallback strategy: Select a preferred fallback variation from the Preferred option in case there is no winner drop-down. This will ensure the campaign continues seamlessly even if no winner is determined during the test period.
- Once done, click Apply.
- You can now proceed with configuring the merchandising strategy.
- If testing Variation A against Variation B, you’ll need to customize the result set for each variant.
- If testing Variation A against Netcore Unbxd’s default result set, you’ll only need to set the strategy for Variation A.
Refer here for A/B Test reports documentation.
Design your merchandising strategy
With Query-specific rules, you can create rules using one or a combination of these options:
- Boost/Bury: Increase or decrease product visibility.
- Sort: Arrange products based on specific criteria.
- Pin: Fix key products at any exact position from 1 to 50.
- Slot: Assign multiple products to predefined positions in a single go.
- Filter: Exclude or include products from a superset.
- Variant Locking: Strategy for variant locking
Updated about 1 month ago
