
Rule Propogation
Propagate merchandising rules across multiple sites with Rule Propagation
Overview
Rule Propagation lets you push merchandising rules, such as Promotions, Collections, Segments, Badges, Banners, Redirects, and Facets, from one site to one or more destination sites. You no longer need to manually recreate a rule on every site where it should apply.
Propagation handles dependencies for you. If a rule references a Collection, Segment, or Field Property that does not exist on the destination site yet, Rule Propagation creates it as part of the same run. If it already exists, Rule Propagation reuses it, so you do not lose historical performance data for rules that have not actually changed.
Prerequisites
- The destination sites must already exist in your account. Rule Propagation does not create sites.
- If you plan to use a Site Group instead of individual sites, confirm its membership first, or create one if it does not exist yet. See Creating a Site Group below.
- Decide whether you need Skip or Override mode before you start. Refer Conflict resolution modes if you are unsure which one you need.
Site Groups
A Site Group is a named set of sites you can select as a single propagation destination, instead of picking each site individually, useful for sending the same rule to every site that shares a region, language, or festival.
Only an Unbxd user, or an account Owner or Super Admin, can create one, from Account Settings > Site Group. A site can belong to more than one group, and groups are currently used only for Rule Propagation.
Creating a Site Group
A Site Group is a named set of sites you can select as a single propagation destination, instead of picking each site individually. It is useful when the same rule needs to go out to several sites at once for a shared reason, for example every site that observes a particular regional festival, or every site in a given language or region.
Only an Unbxd user, or an account Owner or Super Admin on your account, can create a Site Group.
To create one:
- Go to Account Settings, next to Sites, and open Site Group.
- Click Add Site Group and give it a name.
- Choose the sites that belong to this group.
A site can belong to more than one Site Group at the same time. Site Groups are currently used only for Rule Propagation.
Step 1: Select Rules to Propagate
On any merchandising rule listing page (for example, the Promotions page), a checkbox column appears on the left of each row. A master checkbox at the top of the column selects every eligible row on the page. Two kinds of rows are excluded from it:
- Global Rule rows. Propagating a Global Rule affects your whole site, so you must select it manually. Doing so shows a warning: "You have chosen the Global Rule for Propagation. It will impact your whole site!" Dismiss it with the cross icon, which also removes the Global Rule from your selection.
- Expired rows. Their checkbox is disabled and greyed out, with a tooltip explaining that expired rules cannot be propagated.
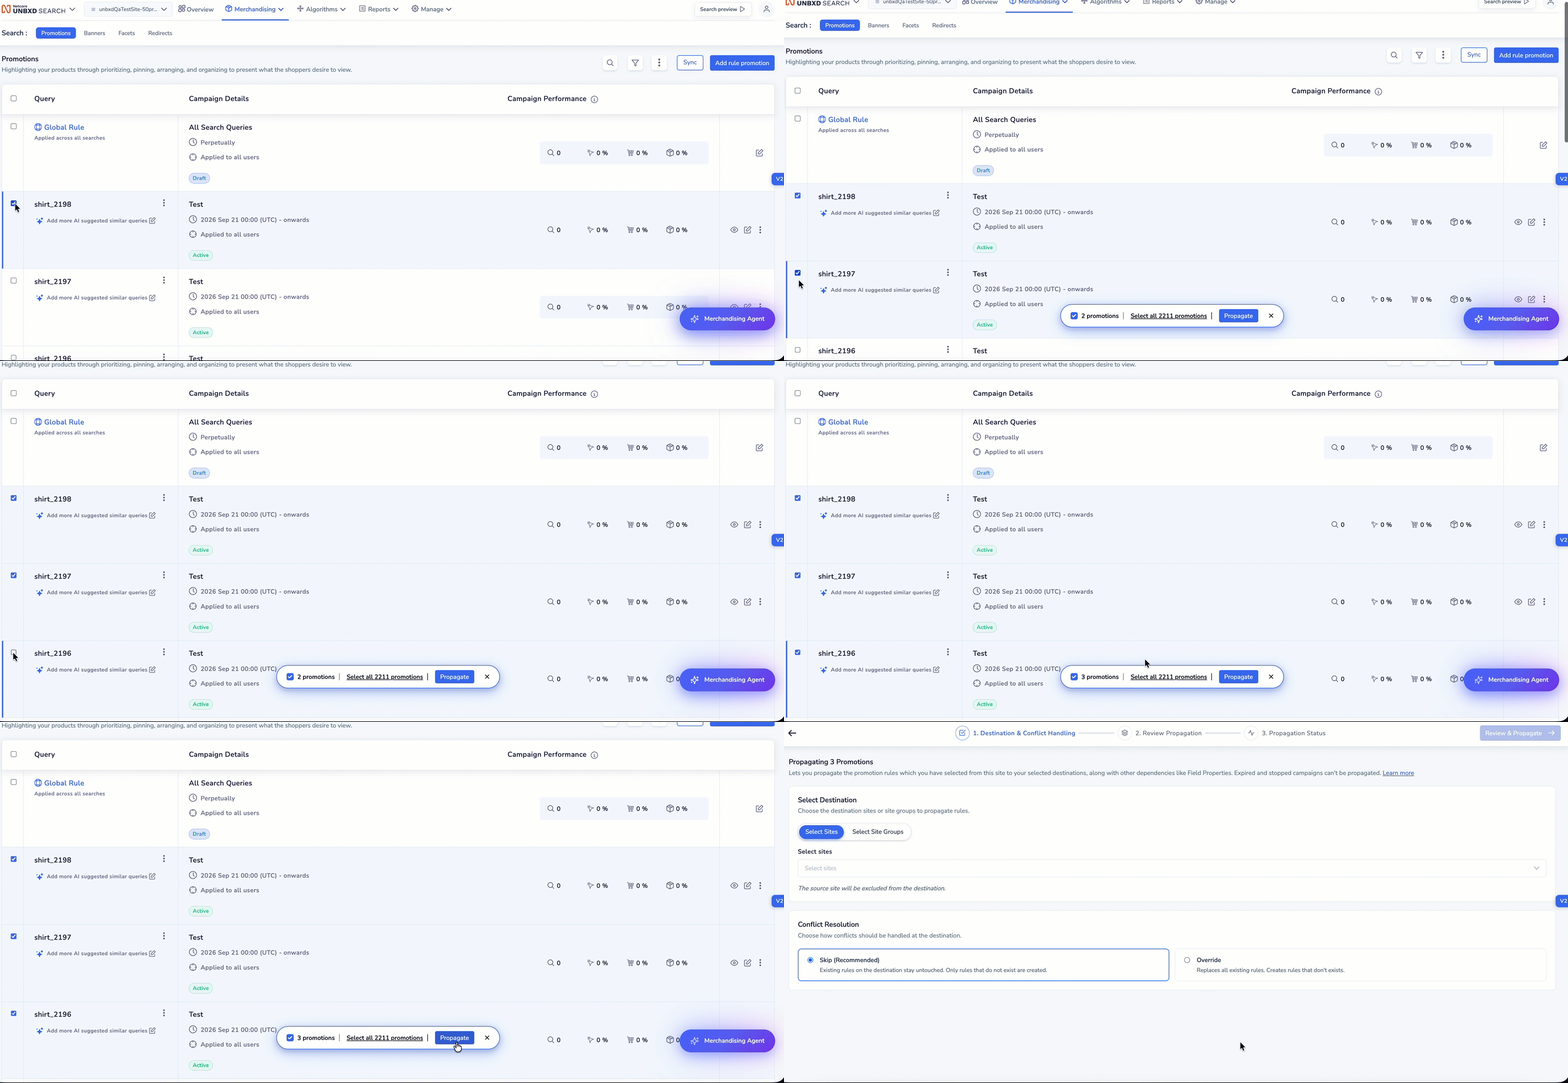
Propogating Rules from Promotion
Active, Upcoming, Draft, and Stopped rules can all be selected, individually or through the master checkbox. To propagate a single rule without selecting anything else, use Propagate this rule from the row's 3-dot menu.
Once one or more rows are checked, a floating action bar slides up from the bottom of the page showing your selected count. Click it to open the propagation modal with those rules pre-loaded. The bar disappears again if you clear your selection.
Step 2: Choose Destination and Conflict Mode
Click the propagation icon to open the Propagate rules modal.
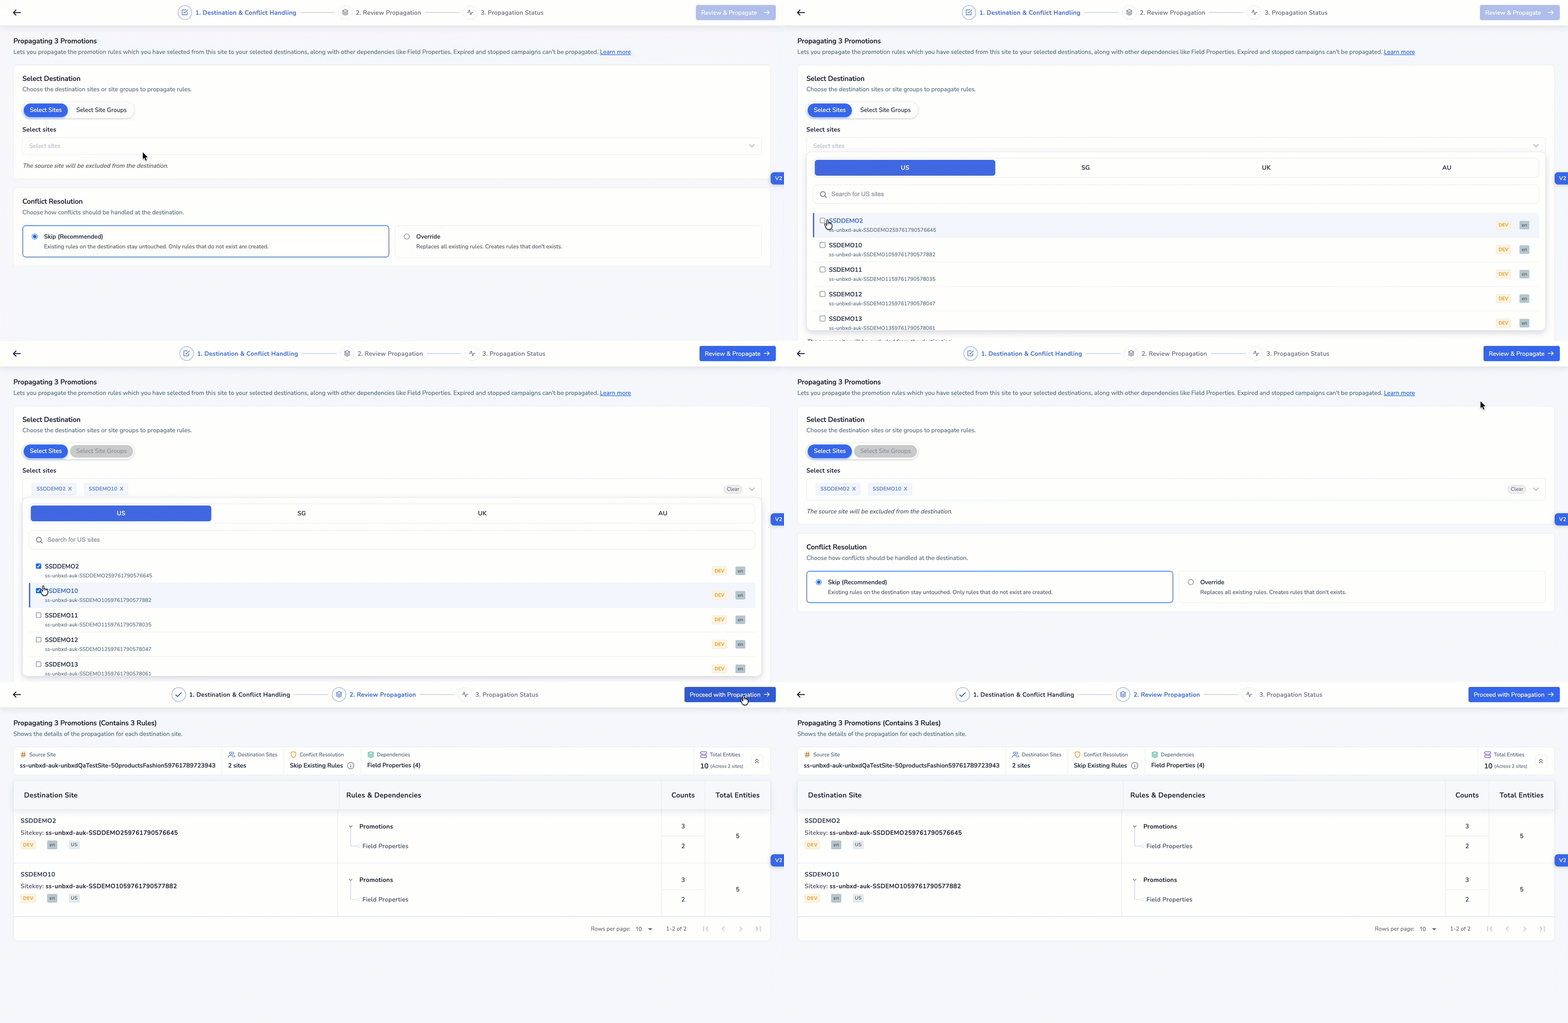
Choose Destination and Conflict Mode
Destination
Choose one of two ways, separated by an "OR" divider; selecting one blocks the other.
- Select Sites. A multiselect dropdown lists every available site with its environment badge (PROD, DEV, or STAGE) and language chip. You can mix sites across different regions in the same run, for example choosing some sites in the US region and some in the UK region together. An All Sites shortcut sits at the top. Selected sites appear as removable chips below the dropdown.
- Select Site Group. A single-select dropdown of your existing Site Groups. Selecting one expands it inline to show its actual member sites as chips, so you see concretely what you are about to affect rather than trusting a group name.
If the source site ends up inside your selected destination, through a manual pick, "All Sites," or a Site Group, it is automatically removed, with a note above the chips: "[Source site] was removed, you can't propagate to your own source." This is never silent. If no destination sites are configured at all, the dropdown shows an empty state linking to Manage > Sites.
Conflict mode
| Mode | What it does |
|---|---|
| Skip (default) | Only creates rules that do not already exist on the destination. Everything else is left untouched. |
| Override | Creates missing rules and rebuilds any that differ from source. Rules that already match are left untouched, so their performance history stays intact. |
Skip is the default because it is non-destructive. Switching to Override is a deliberate choice, not an accident waiting to overwrite a production site. Full matching behavior for each mode is covered in Conflict resolution modes.
- Click Continue to move to the confirmation screen; it stays disabled until a destination is resolved.
- Click Cancel, or close the modal, to discard your selections. There is no draft state.
Step 3: Review the Confirmation Screen
Review the confirmation screen. Follow the steps below to do so:
At the top, the screen summarizes your source site, how many destination sites are in the run, and a total entities count, which sums every rule and every dependency being propagated across all destination sites in one number.
Some of your originally selected destination sites may be excluded from the run entirely, with a count and reason shown for each, for example a feature mismatch between the source site and that destination. Excluded sites are called out separately from the per-site Ready and Blocked statuses described below, since an excluded site is dropped from the run rather than attempted and flagged.
- Site identity: name, environment badge, language chip.
- Dependency summary: a plain count of Collections and Segments involved, for example "Collections: 7 · Segments: 5."
- Outcome: the result you are scanning for, for example "Promotions: 9 ready, 1 might fail."
- Status pill: Ready (green) means nothing will fail or block. Blocked (red) means a dependency it needs is unavailable.
A rule that will fail for a reason unrelated to a blocked dependency (for example, a field type mismatch) shows that reason in its nested detail without preventing you from proceeding. For a Blocked site, the expanded detail links to where the dependency can be resolved; there is no in-flow fix here. Fixing it elsewhere and returning updates the row to Ready automatically on your next visit.
A single disclaimer banner always appears, covering the fact that Collection and Segment matches are by name only, not content.
Click Proceed with propagation to start the job, or ← Back to return to Step 2 with your selections preserved. Changing your destination and returning regenerates this screen fully.
Step 4: Track Propagation Status
A collapsible summary bar at the top of this screen gives you the run-level view; expand any site row for its own pipeline.
Each site row shows its identity on the left, followed by three connected chips in order: Collections → Segments → Promotions. Each chip shows the entity name, and once that step finishes, a status and fraction (for example "20/20" or "3/8"). No numbers show while a step is pending or running.
Field Properties also appears to run as part of the dependency stage alongside Collections and Segments. Confirm with Engineering whether it renders as its own visible chip in the shipped UI, since this guide currently describes three chips only.
| State | Meaning |
|---|---|
| Pending | Has not started. Promotions always starts here. |
| In Progress | Actively running; no counts yet. |
| Success | Every item in this step succeeded. |
| Partial Success | Some items succeeded, some failed. |
| Failed | Every item in this step failed. |
Promotions stays Pending until Collections and Segments both reach a terminal state (Success, Partial Success, or Failed) regardless of how clean that outcome was. It then moves to In Progress and resolves on its own. A run can show Partial Success even when only one item out of many failed, for example 10 promotions on one site where eight are skipped, one is created, and one fails. Multiple sites animate one after another rather than all at once.
A View detailed report → link appears for each site once its job starts, even before it finishes. There is no retry action on this screen; retrying happens from the detailed report.
Step 5: Review the Detailed Report
Find this under Activity History, in your profile section, once a propagation run has started.
From the detailed report, you can:
- See every rule and dependency labeled as Created, Ignored, Replaced (config), Replaced (status), Skipped, or Failed. Dependency-specific outcomes are explained in How dependencies are resolved.
- Filter by who created the rule, entity type, date, status (All, Success, Failed, Skipped), and destination site.
- Click Retry failed to re-enter the confirmation flow with only the failed items. Dependencies recalculate fresh, and a new job starts once you confirm.
- Export the report.
- Request a report for one specific site, sent to your registered email address.
- Click Email Report for a full, consolidated report across every destination site, also sent to your registered email address.
Conflict Resolution Modes
Rules are matched between source and destination using the Query and the Campaign (rule) Name together. Internal rule IDs are never used for matching, since they are not shared across sites or regions.
Skip Mode
| Condition on destination | Action |
|---|---|
| Query not present | Create the query and its rule |
| Query and rule name both exist | Leave the destination untouched |
| Query exists, rule name does not | Create the new rule under the existing query |
Override Mode
| Condition on destination | Action |
|---|---|
| Query and rule name match, status differs | Delete and recreate from source |
| Query and rule name match, status same, checksum matches | Leave untouched; analytics preserved |
| Query and rule name match, status same, checksum differs | Delete and recreate from source |
| Query exists, rule name is different | Create a new rule; existing destination-only rules are never deleted |
The config checksum used in Override mode covers only the rule's configuration: boost, bury, pin, slot, and filter conditions, variant locking, segment reference, collection reference, and the similar-query list. It excludes rule name, status, and dates, so a rule whose live/draft state or schedule changed, but whose configuration did not, is not needlessly deleted and recreated.
Rule Propagation applies one Override or Skip flag to the whole run; you cannot choose Override for one dependency and Skip for another. If you need individual control over a specific Collection, Segment, or Field Property, propagate that rule type independently from its own page.
Resolve Dependencies
The system first reads every rule you selected and extracts every Collection, Segment, and Field Property they reference, across your whole selection at once. A Collection referenced by three promotions in your selection is checked and created only once per destination, not three times.
Each dependency touched by a run is recorded as one of:
- Not found, created. For example: "summer-sale, not found on this site, created from source." A newly created dependency is guaranteed to match source exactly.
- Found by name, used as-is. For example: "clearance, already existed on this site, used as-is. Contents may differ (matched by name only)." Not a failure, but a disclosed assumption that same name means same thing. This is the line to check if a promotion appears to pull the wrong products on a given site.
- Found, specific difference detected and corrected. For example: "v_ring, flag was missing on destination, added (append-only, other flags untouched)." Unlike the case above, a real gap was found and fixed rather than assumed away.
- Not found, could not be created. Only applies to Field Properties, since Collections and Segments are always creatable. For example: "v_ring, attribute does not exist in destination catalog. Rule failed, requires feed upload and reindex."
Some specifics by dependency type:
- Segments are created as empty shells with no configuration. If one was created for you, you still need to configure and upload its data on the destination separately.
- Field Property changes are append-only. Existing flags are never removed, and properties unrelated to your selected rules are never touched.
- Resolution is isolated per item and per destination. If one Collection fails to clone on a given destination, only the rules depending on it are marked failed there; everything else in the run, on that destination or others, completes normally.
Rule Types and Conflict Resolution
| Rule type | Conflict resolution |
|---|---|
| Promotions | Override / Skip |
| Searchable Fields | Override / Skip |
| Segments | Created by name only as a dependency; full Override / Skip when propagated independently |
| Collections | Full Override / Skip when propagated independently |
| Field Properties | Append-only as a dependency; full Override / Skip when propagated independently |
| Badges | Full Override / Skip when propagated independently |
| Facets (Search) | Covered by Rule Propagation; exact Override / Skip granularity to confirm |
| Facets (Catalog) | Covered by Rule Propagation; exact Override / Skip granularity to confirm |
| Banners | Covered by Rule Propagation; exact Override / Skip granularity to confirm |
| Redirects | Covered by Rule Propagation; exact Override / Skip granularity to confirm |
Algorithm rules and Reports are not covered by Rule Propagation.
Site Cloning vs Rule Propagation
Site Cloning is functionally a subset of Rule Propagation: a bulk propagation run in Override mode. Use it when you need a wholesale copy of one site's configuration onto another. Use Rule Propagation when you need granular control over which individual rules move, and in which mode.
Edge Cases
| Situation | What happens |
|---|---|
| A rule is renamed on the source before propagating | Treated as a new rule. The old-named rule on the destination is left in place, creating a duplicate by design, not an error. |
| A selected Site Group's only member is the source site | The destination list ends up empty after source removal; Continue stays disabled with an explanation. |
| A landing page references a Collection that was dropped for having no matching products | The landing page is also dropped, with the same reason shown. |
Updated about 12 hours ago